Everything here, I've used myself. If you buy through these links, I earn a small commission — but that's not why I wrote this.
TL;DR: This OpenClaw install guide walks you through setting up a private AI assistant on your own server, with Telegram as the chat interface. No coding experience needed. Budget: about $24/month for the VPS and $5-10/month for AI usage. Total setup time: roughly 2 hours. I rebuilt this setup from scratch twice; this guide reflects what actually works after the debugging.
For the business case behind this build, read How I Built a Private AI Assistant That Runs My Morning Briefings.
What Is OpenClaw (and Why Install Your Own AI)?
OpenClaw is a free, open-source platform that lets you install and run a private AI assistant on a VPS you control, using Telegram as the chat interface and your choice of AI model (Claude, Gemini, or others). Think of it like having your own private ChatGPT that:
- Lives on your server — your conversations and data never go to a third party
- Talks to you through Telegram — just like texting a friend
- Can read your email, check the news, and brief you every morning — automatically
- Uses the AI model you choose — Claude, Gemini, or others
You don’t need to be a developer. If you can follow step-by-step instructions and copy-paste commands into a terminal, you can complete the OpenClaw install and setup in about two hours. The total running cost is roughly $24/month for a DigitalOcean VPS with 4GB RAM and 2 CPUs, plus $5-10/month in AI API usage.
Want this guide offline? Get the PDF version — all 11 steps in a printable format you can follow at your own pace.
Step 1: Create Your Accounts (15 minutes)
The OpenClaw install requires accounts on four services: DigitalOcean (server host), Anthropic (Claude API), Google AI Studio (Gemini API), and Telegram (chat interface). All are free to sign up. Open each link below in a new tab and create an account:
1a. DigitalOcean (your server host)
Go to digitalocean.com and create an account. This is where your AI assistant will live. They’ll ask for a credit card, but you won’t be charged until you create a server.
1b. Anthropic (for the Claude AI model)
Go to console.anthropic.com and create an account. Once you’re in:
- Click API Keys in the left sidebar
- Click Create Key
- Give it a name like “OpenClaw”
- Copy the key and save it somewhere safe (a notes app or password manager). You won’t be able to see it again.
This key lets your assistant use Claude’s AI. You’ll add credit later — $5 is enough to start.
1c. Google AI Studio (for the free Gemini model)
Go to aistudio.google.com and sign in with your Google account. Then:
- Click Get API Key in the top left
- Click Create API Key
- Copy and save this key too
Gemini’s lighter models are free or near-free for typical usage, which makes them perfect for routine tasks so you don’t burn through your Anthropic credits. As of March 2026, Gemini 3.1 Flash Lite is the best value option.
1d. Telegram (your chat interface)
If you don’t have Telegram yet, download it from telegram.org on your phone and/or computer. Create an account with your phone number.
1e. Gmail App Password (for email integration)
If you want your assistant to read your email (optional but useful), you’ll need a special app password:
- Go to myaccount.google.com/apppasswords
- You may need to enable 2-Step Verification first at myaccount.google.com/signinoptions/two-step-verification
- Once you’re on the App Passwords page, type “OpenClaw” as the app name
- Click Create
- Copy the 16-character password and save it. This is different from your regular Gmail password and only works for this one connection.
Step 2: Set Up Your SSH Key (10 minutes)
An SSH key is a cryptographic key pair that authenticates you to your server without a password. It’s required for a secure OpenClaw setup — password-based logins are vulnerable to brute-force attacks that target new servers within minutes of going live.
On a Mac:
- Open the Terminal app (press Cmd + Space, type “Terminal”, hit Enter)
- Paste this command and press Enter:
ssh-keygen -t ed25519 -C "your-email@example.com"- When it asks where to save the file, just press Enter to accept the default location
- When it asks for a passphrase, you can press Enter twice to skip it (or type a passphrase you’ll remember)
- Now copy your public key to your clipboard:
cat ~/.ssh/id_ed25519.pub | pbcopyOn Windows:
- Open PowerShell (press Windows key, type “PowerShell”, hit Enter)
- Paste this command and press Enter:
ssh-keygen -t ed25519 -C "your-email@example.com"- Accept the defaults by pressing Enter through the prompts
- Copy your public key:
Get-Content ~/.ssh/id_ed25519.pub | Set-ClipboardYou now have the public key copied. You’ll paste it into DigitalOcean in the next step.
Step 3: Create Your VPS for OpenClaw on DigitalOcean (10 minutes)
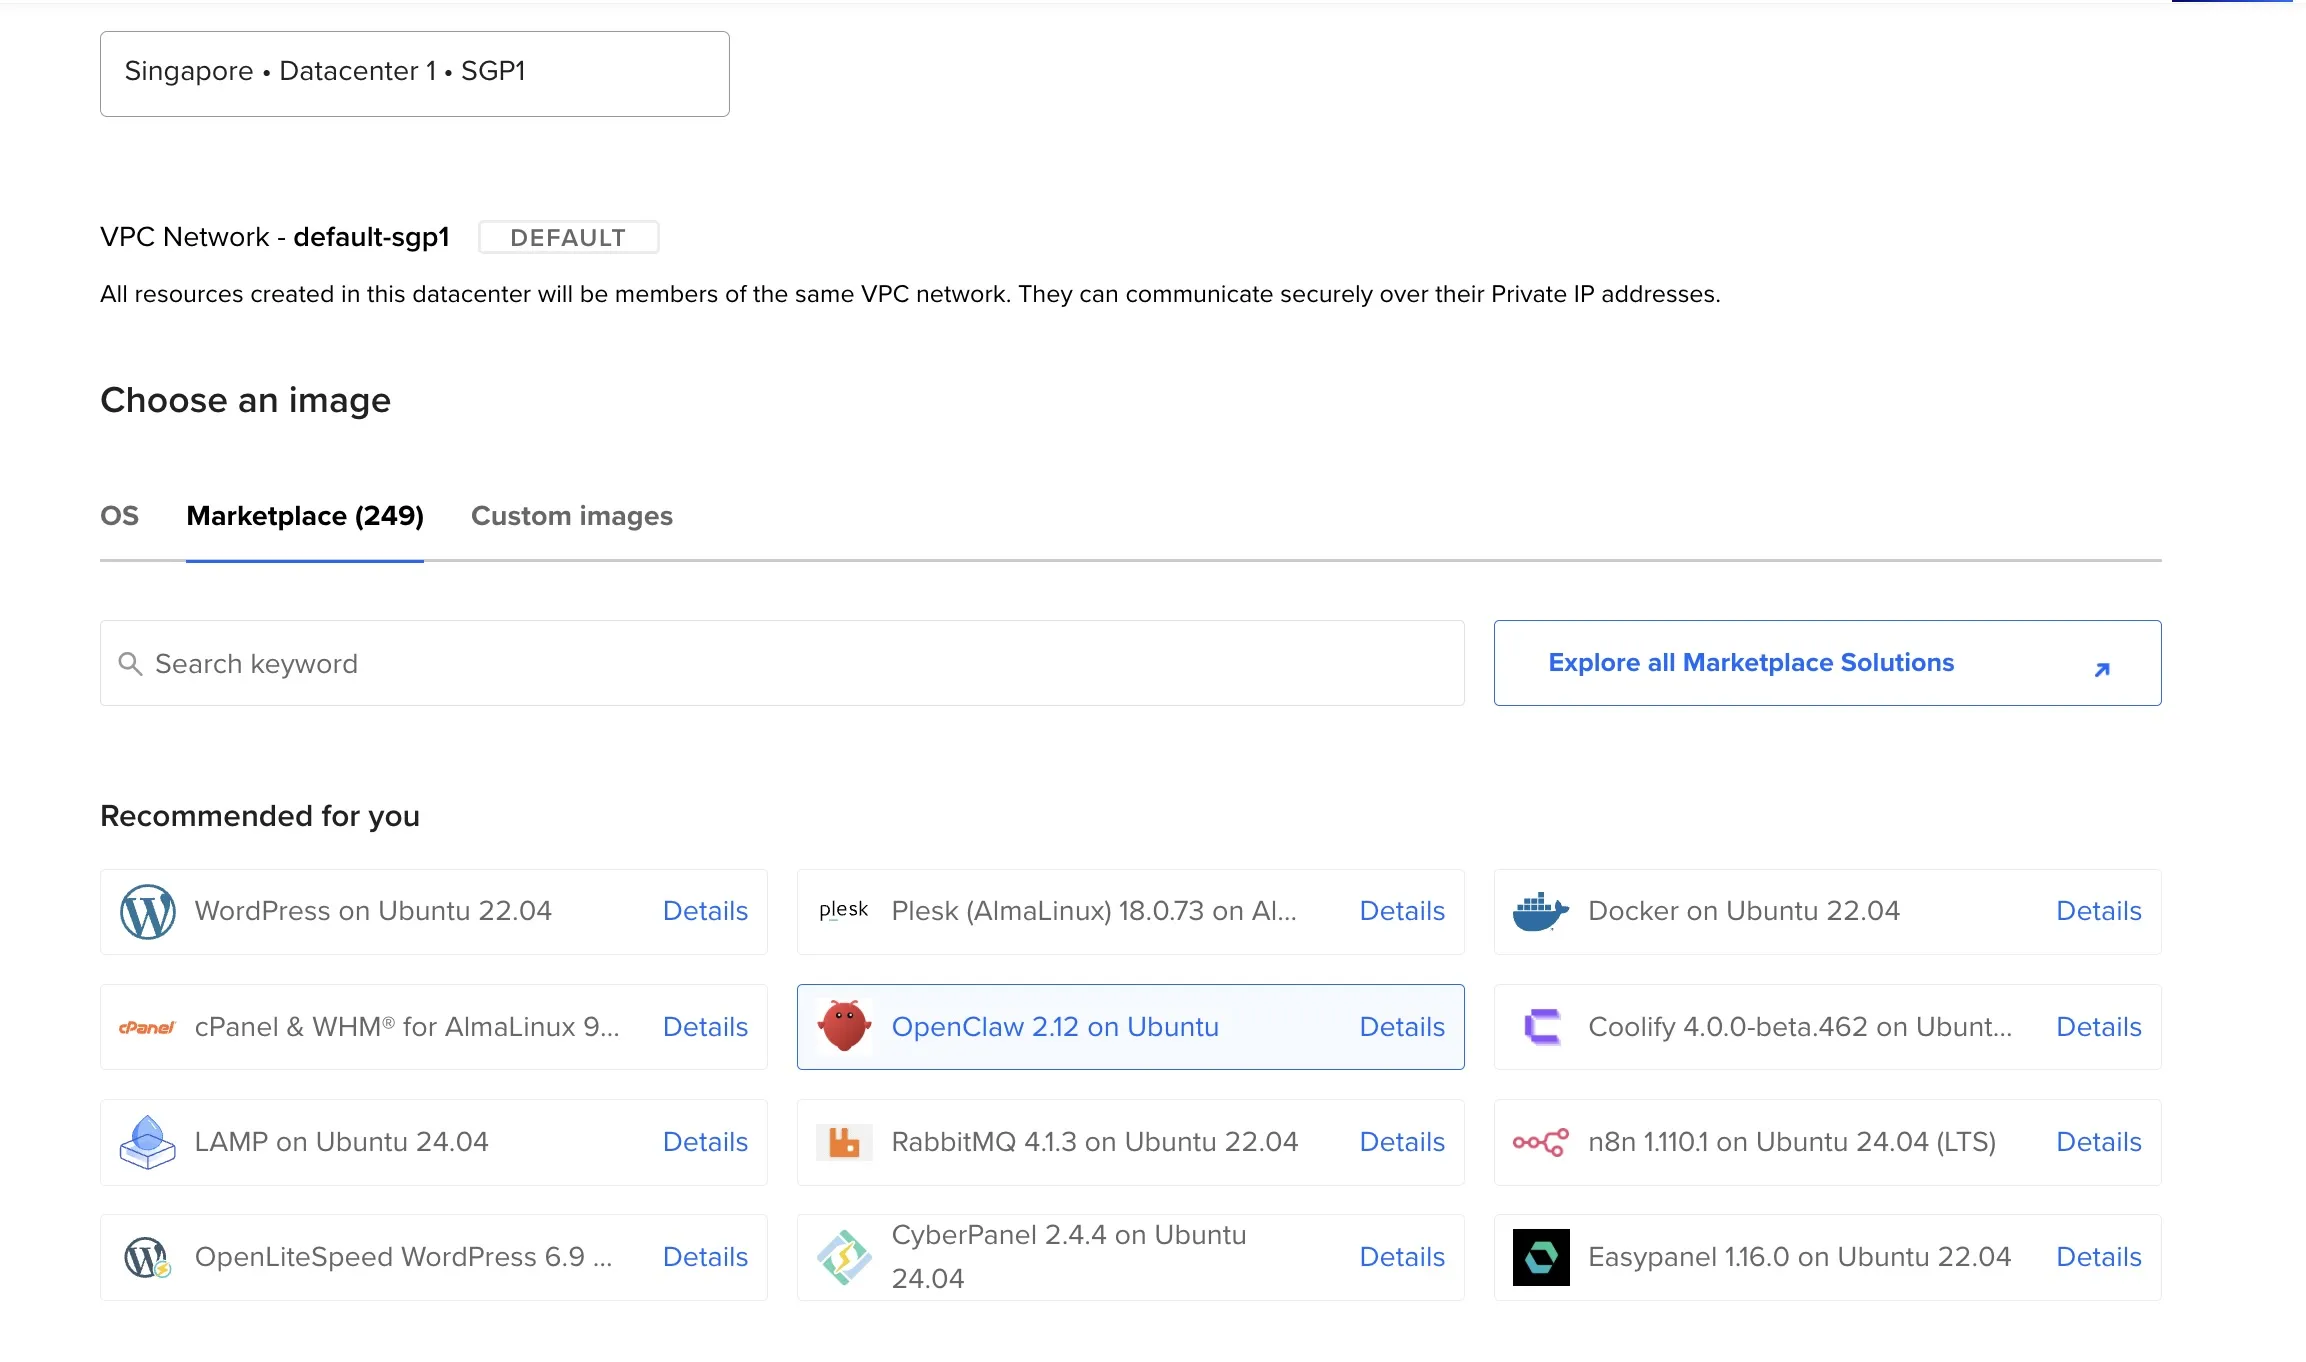
The fastest way to install OpenClaw is through DigitalOcean’s 1-Click Marketplace image, which creates a VPS with OpenClaw pre-installed — no manual Docker install or server configuration needed. Log into DigitalOcean and follow these steps:
3a. Find OpenClaw in the Marketplace
- Click the green Create button in the top right
- Select Droplets
- Click the Marketplace tab
- Search for “OpenClaw” and select it
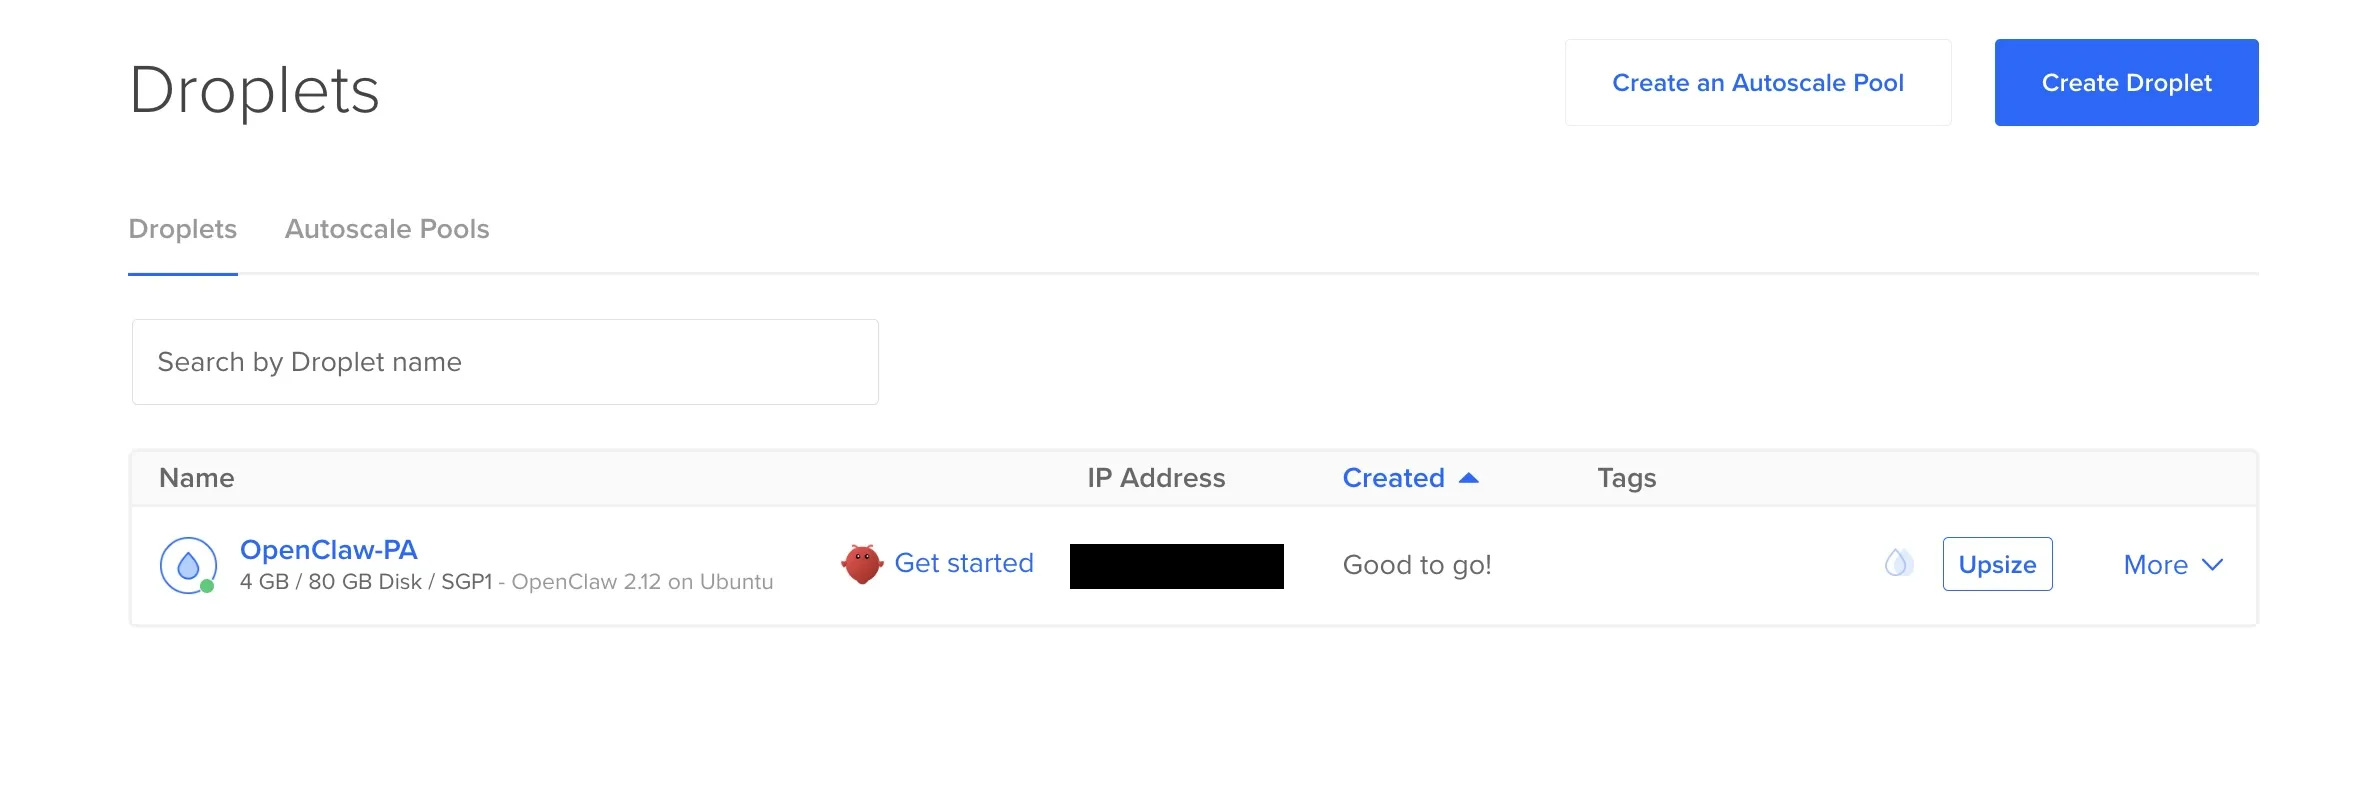
This gives you a VPS with OpenClaw already installed via Docker — no manual container setup needed.
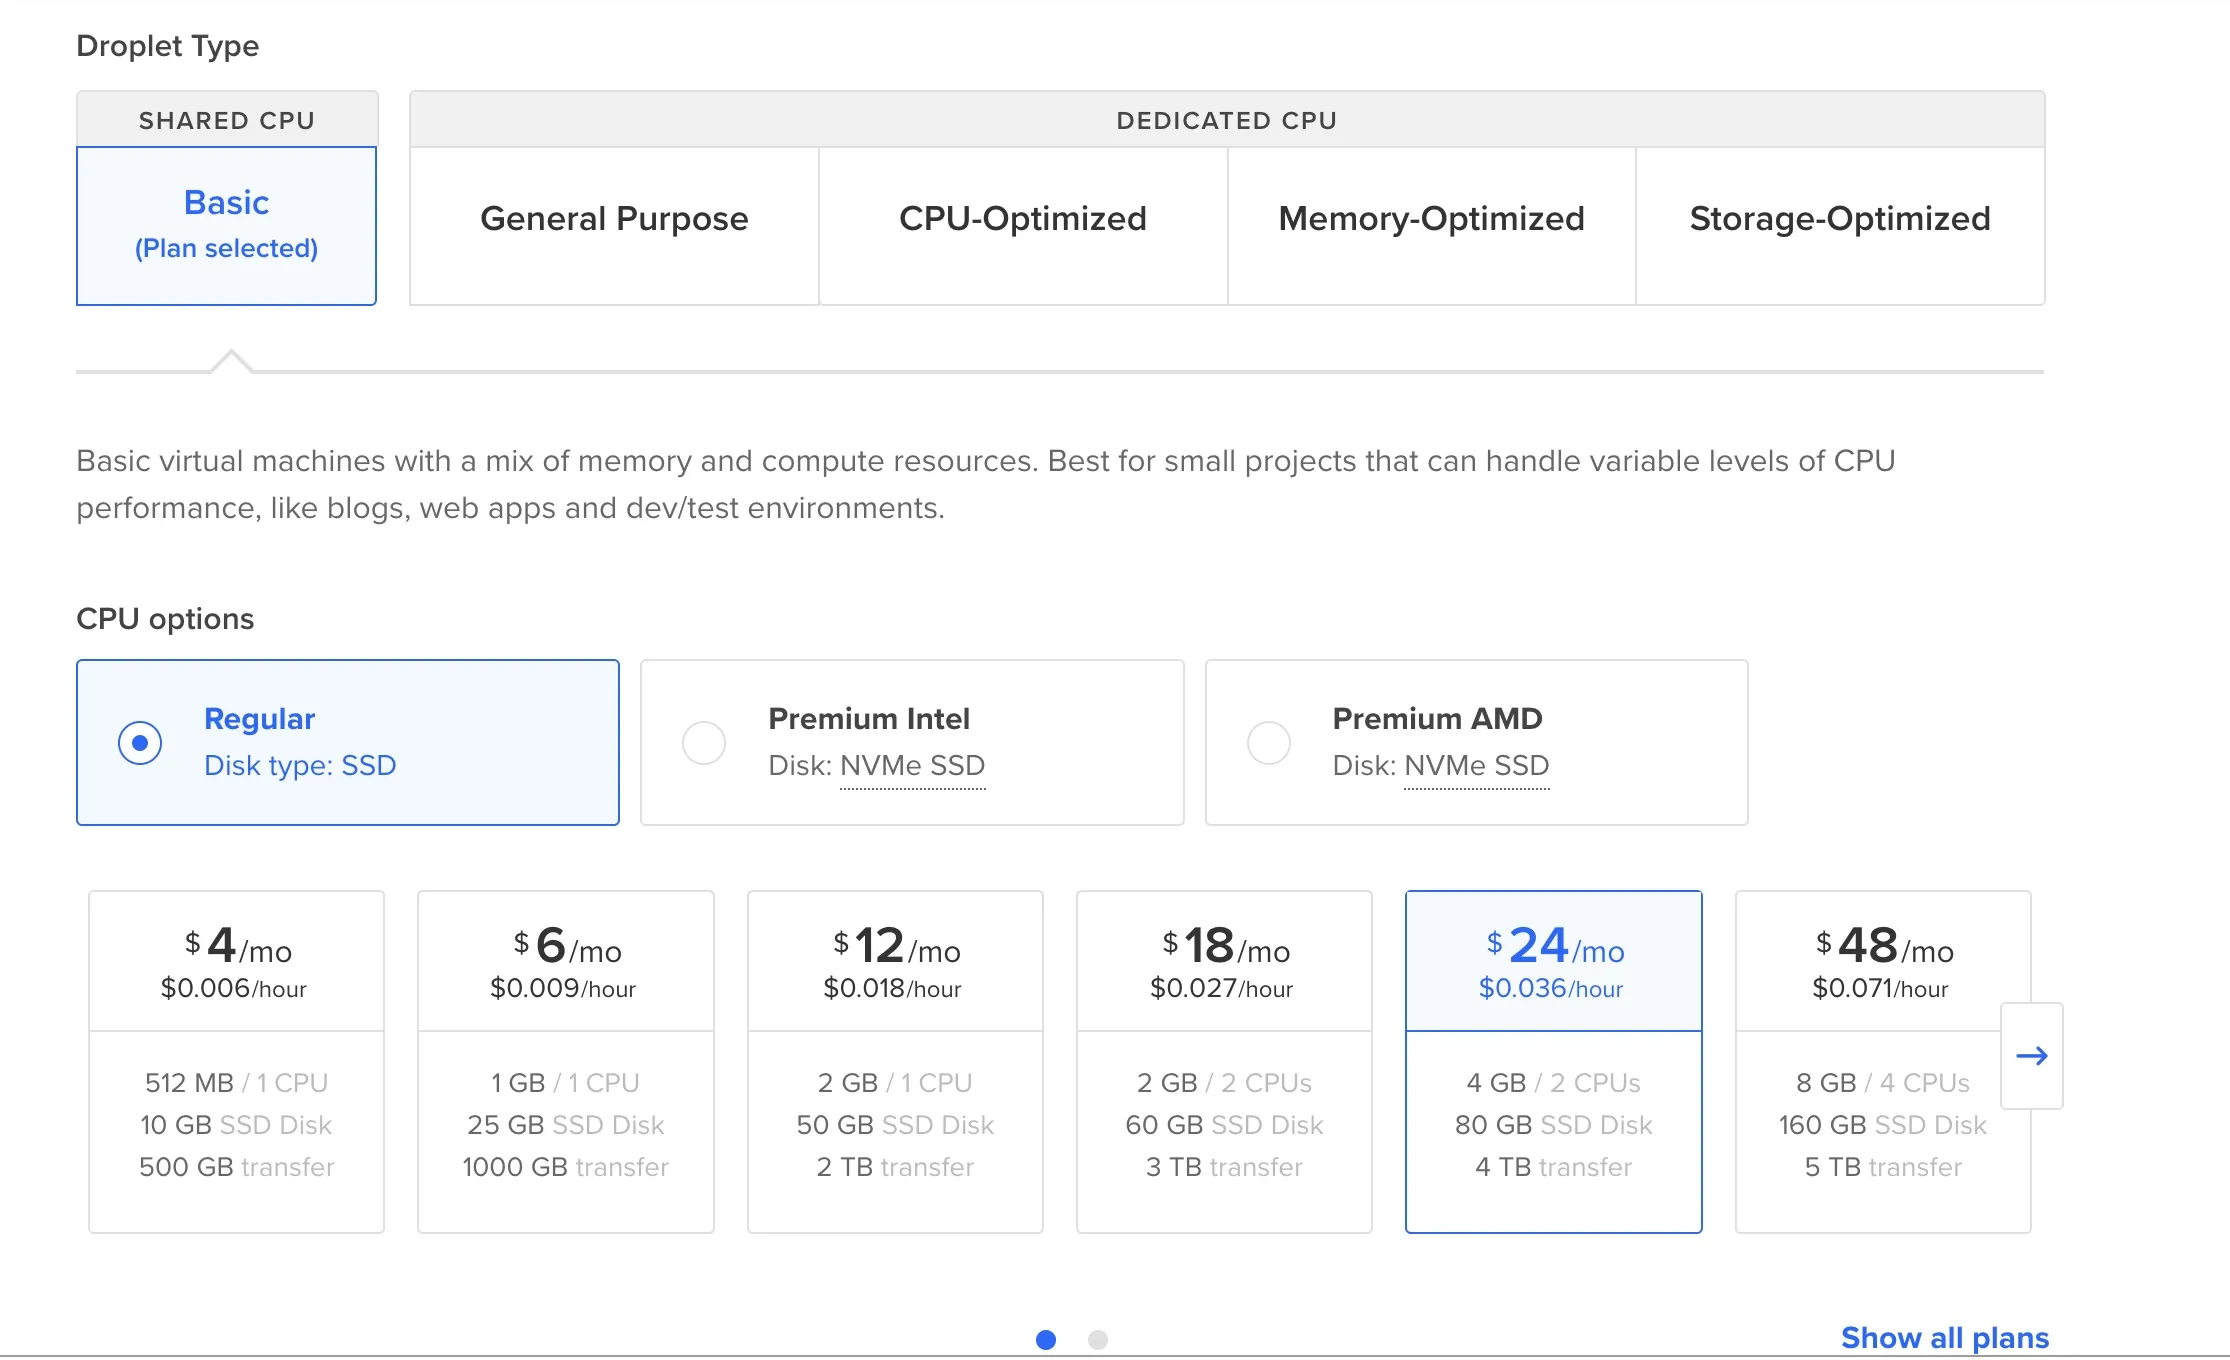
3b. Choose a server location
Pick the region closest to where you live. Closer = faster responses in Telegram. I chose Singapore (SGP1).
3c. Choose the server size
Select Regular (not Premium), then pick the $24/month plan with 4GB RAM / 2 CPUs / 80GB SSD. This is the recommended VPS for OpenClaw — enough to run the assistant with Telegram, email integration, and cron jobs. If you’re considering an OpenClaw Docker install on a different VPS provider, 4GB RAM and 2 CPUs are the minimum specs to target.
3d. Add your SSH key
- Under Authentication, select SSH Key
- Click New SSH Key
- Paste the public key you copied in Step 2
- Give it a name like “My Laptop”
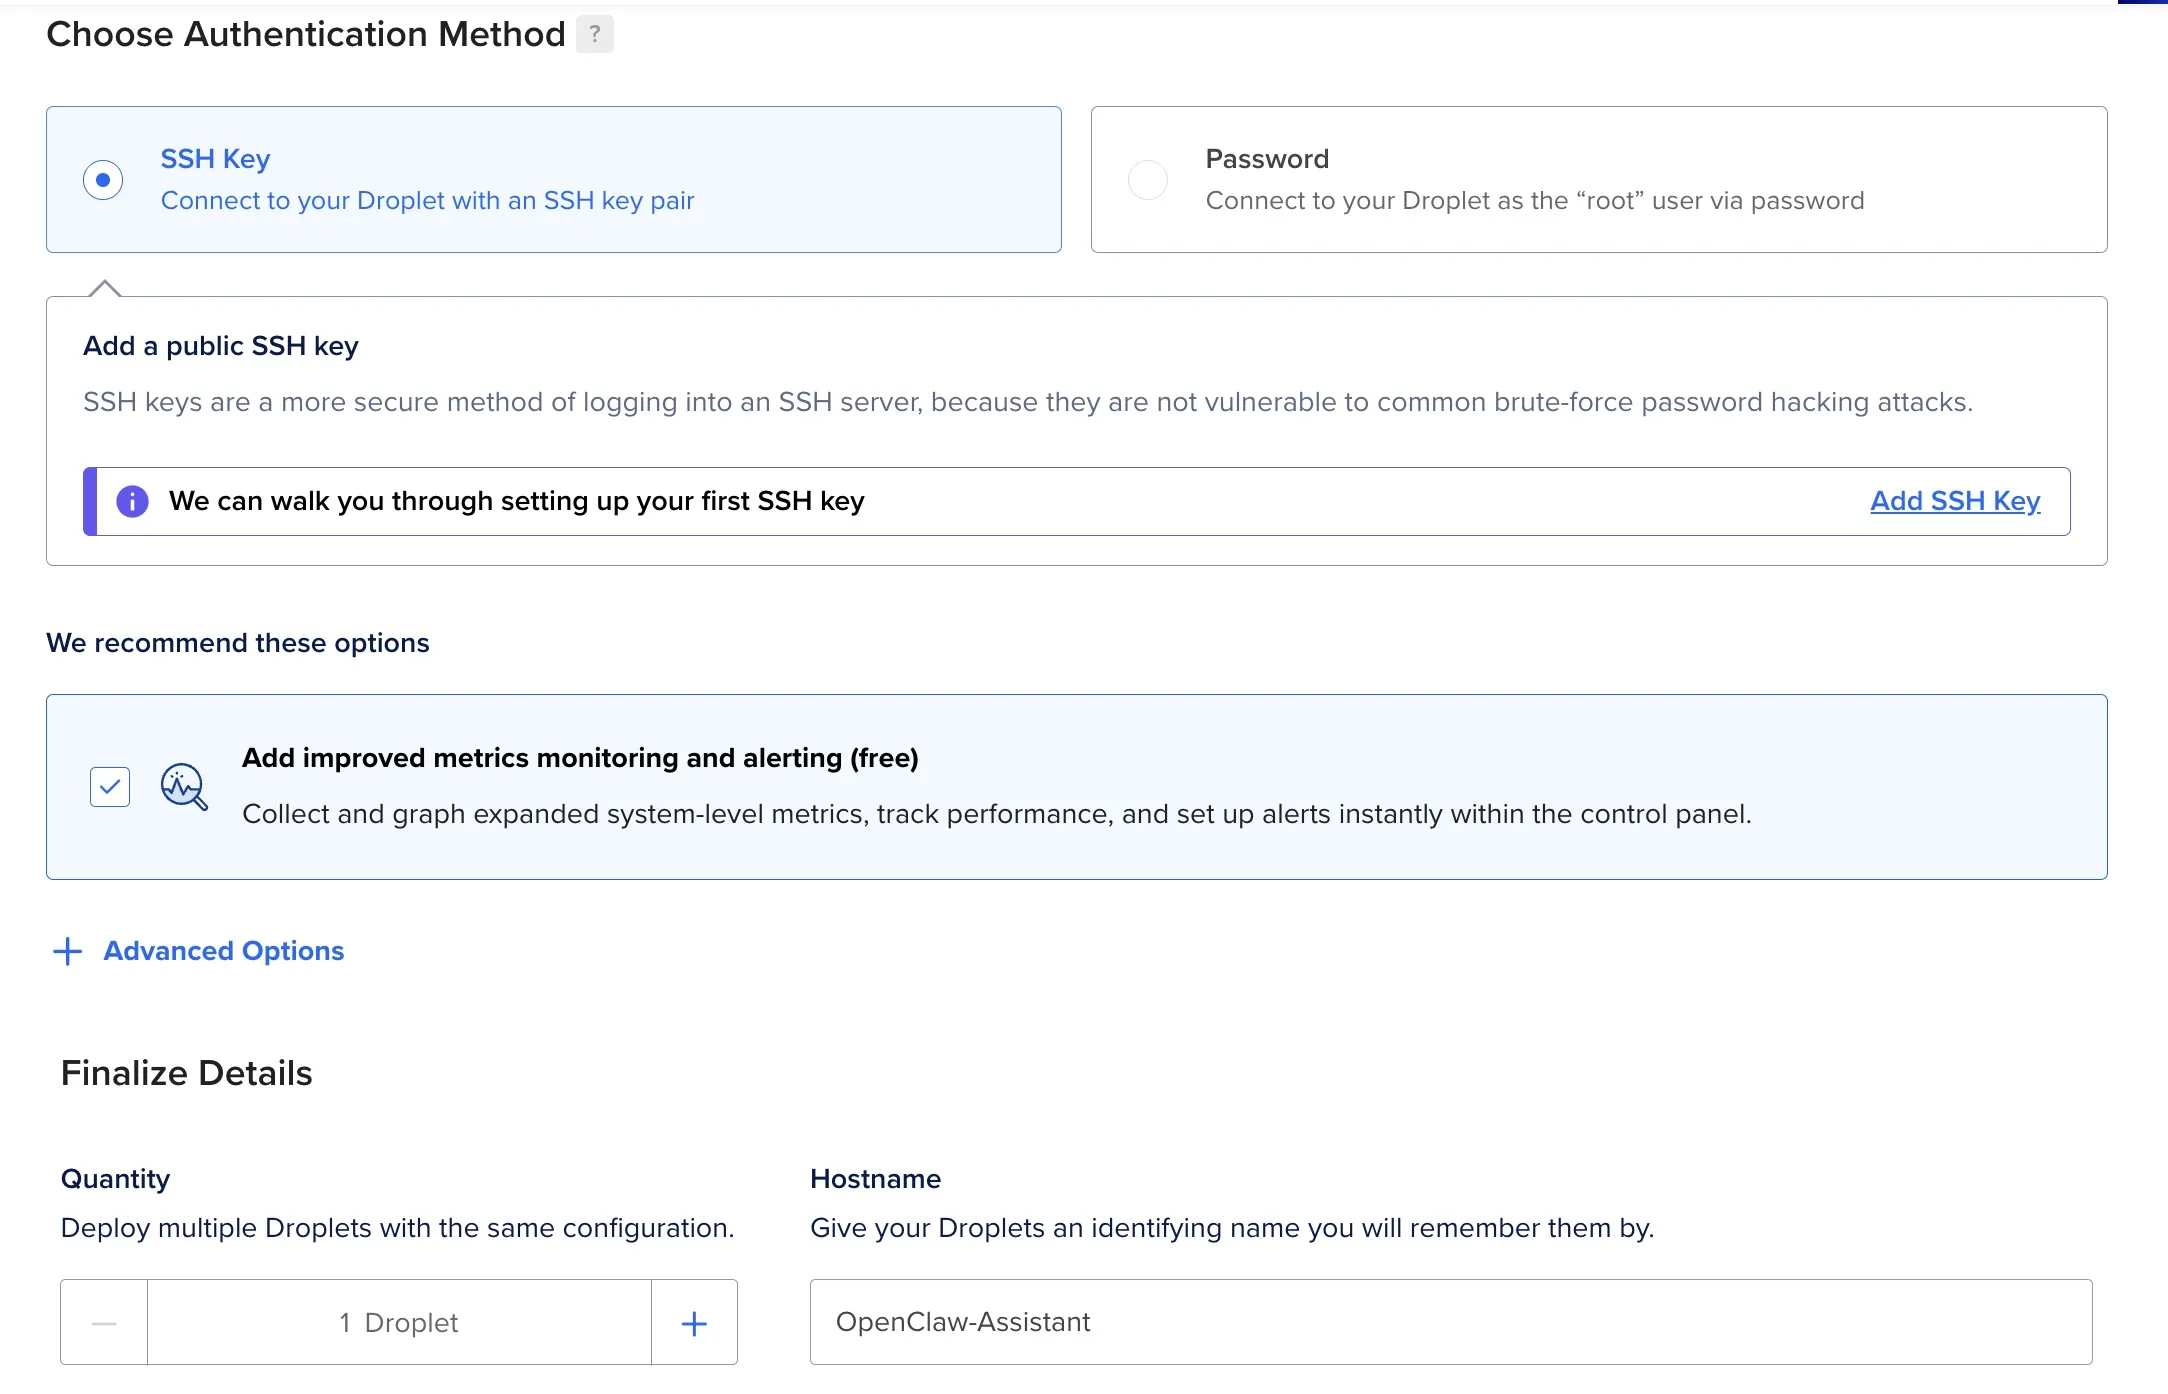
Why SSH instead of a password?
Brute-force resistance. Password auth means anyone on the internet can try logging into your server by guessing passwords. Bots do this constantly — within minutes of a new server going live, you’ll see hundreds of login attempts in your logs. SSH keys use cryptographic key pairs (2048+ bits) that are essentially impossible to brute-force.
Especially important for OpenClaw security. Your DigitalOcean server will be running an AI agent with shell access, Anthropic and Google AI API keys, and potentially access to your Telegram and Gmail accounts. If someone compromises the server via a weak password, they get all of that. SSH key authentication ensures only your specific machine(s) can connect.
Also worth ticking the improved metrics monitoring checkbox if you see it — it’s free and helps you keep an eye on CPU/memory usage.
3e. Create the server
Click Create Droplet. DigitalOcean will take about 60 seconds to spin up your server. When it’s done, you’ll see your server’s IP address (a number like 128.199.123.45). Copy this IP address.
Step 4: Connect to Your Server and Run the OpenClaw Install Wizard (15 minutes)
To complete the OpenClaw install, you’ll SSH into your new DigitalOcean droplet and run through the interactive setup wizard. The wizard configures your Anthropic API key, Google AI key, and generates a gateway token for the web dashboard.
4a. Open your terminal and connect
Open Terminal (Mac) or PowerShell (Windows) and type this command, replacing your-droplet-ip with the IP address you just copied:
ssh root@your-droplet-ipIf it asks “Are you sure you want to continue connecting?”, type yes and press Enter.
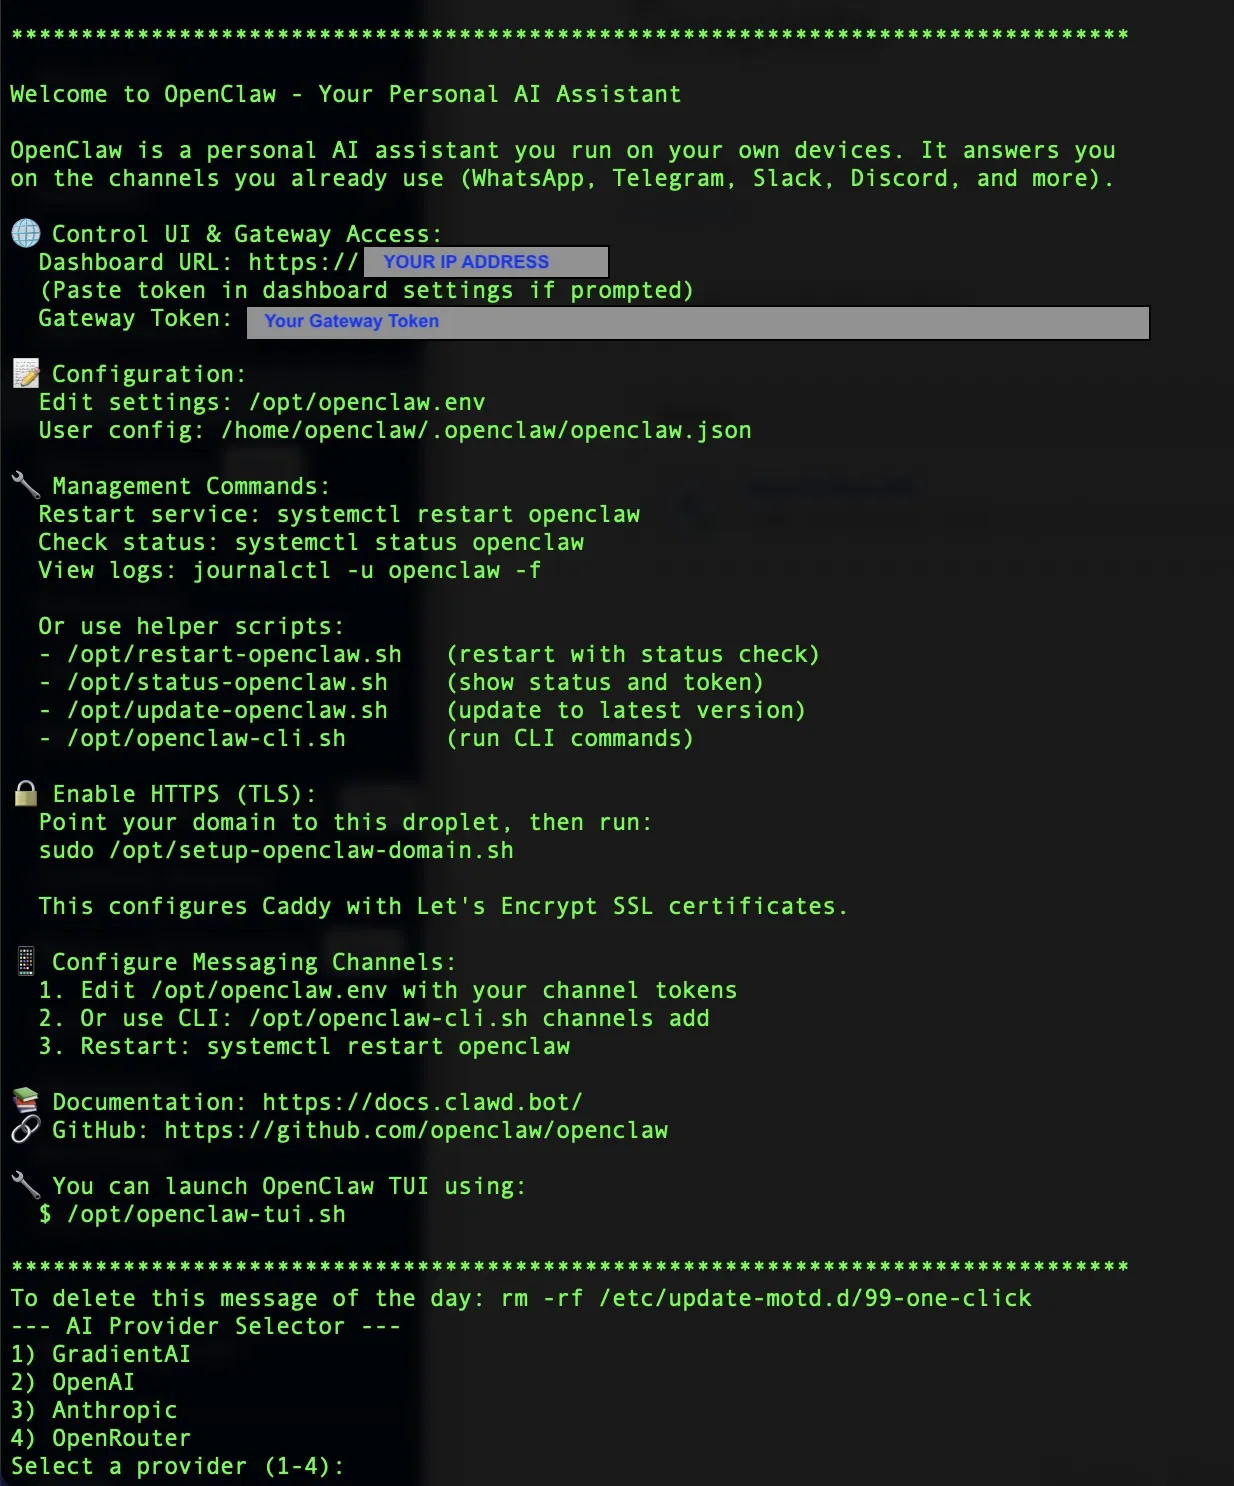
You should see a welcome screen with the OpenClaw logo. You’re now inside your server.
4b. Follow the setup wizard
The setup wizard starts automatically. Here’s what to do at each step:
- LLM Provider — Select Anthropic and paste the API key you saved in Step 1b
- Gateway Token — The wizard will generate a token. Copy this token and save it. You need it in the next step to connect the web dashboard
- Google AI Key — When prompted, paste the Google AI key from Step 1c
Important: Write down or save the Gateway Token somewhere safe. You’ll need it in the very next step.
4c. Understand the “openclaw” user
Here’s something that trips up almost everyone: OpenClaw runs under its own user account called openclaw, not the root account you’re logged in as. This matters later when you edit files or run commands. For now, just remember this rule:
When in doubt, run commands as the
openclawuser, notroot.
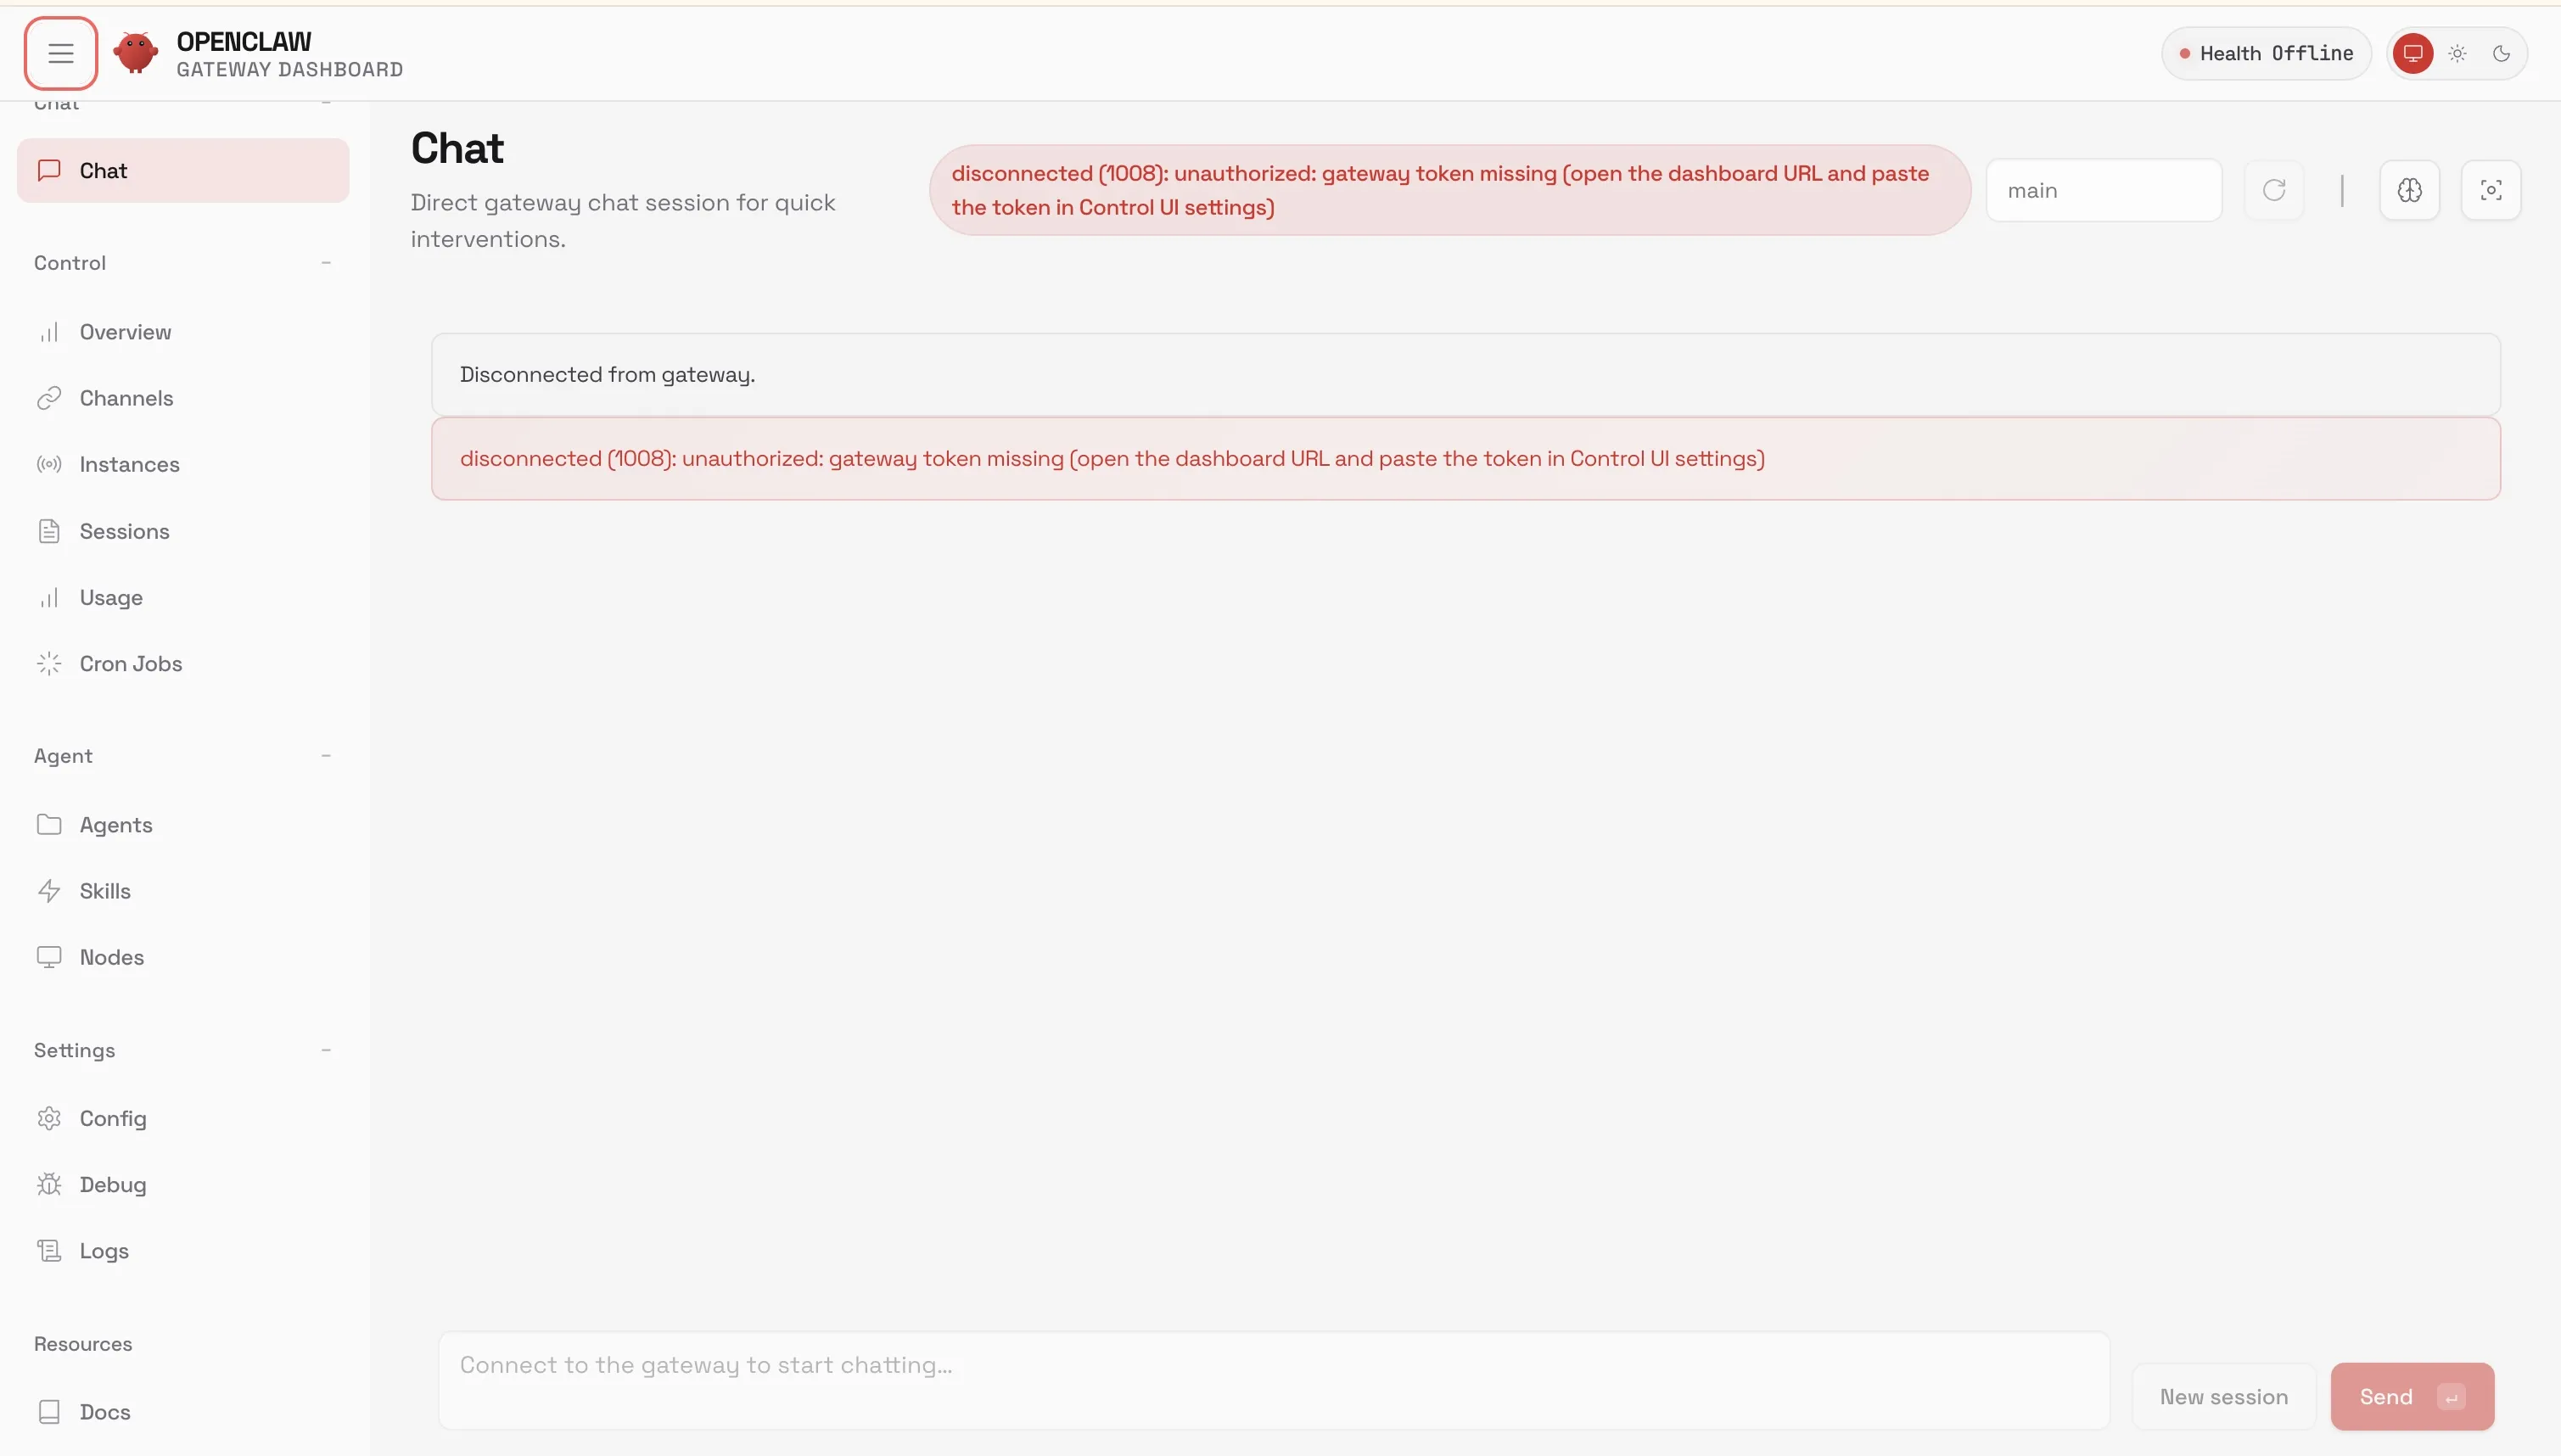
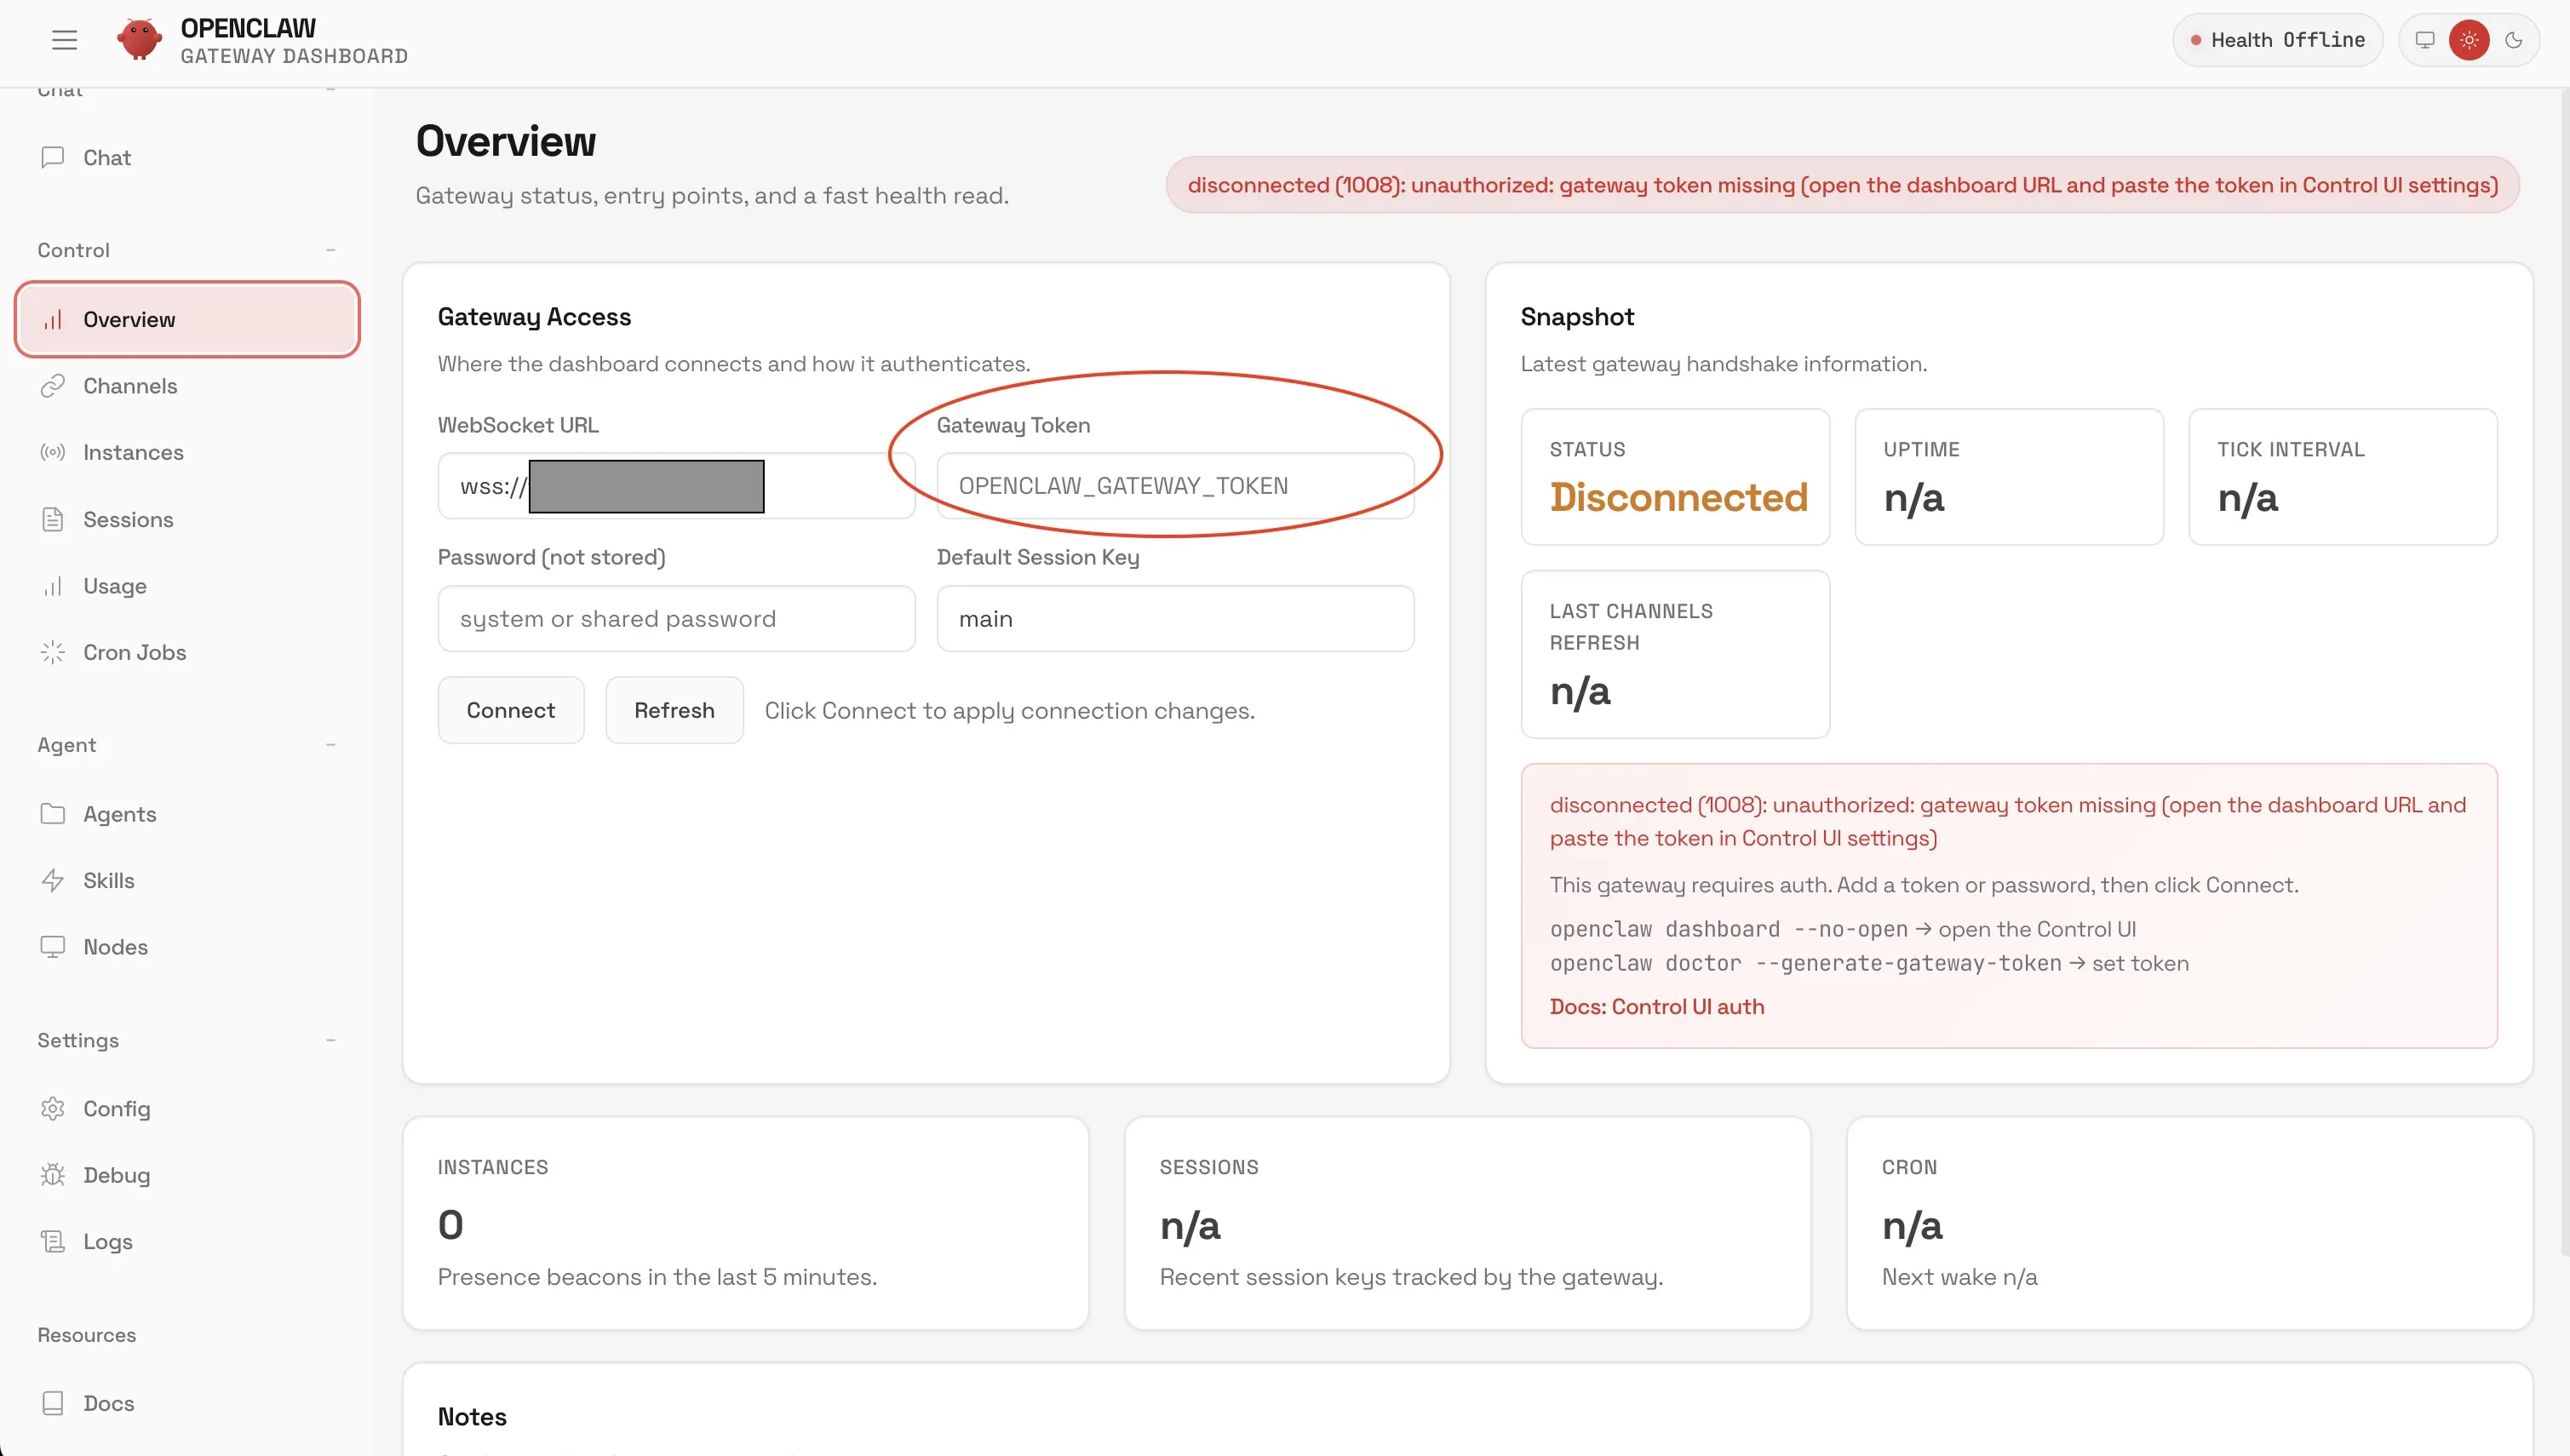
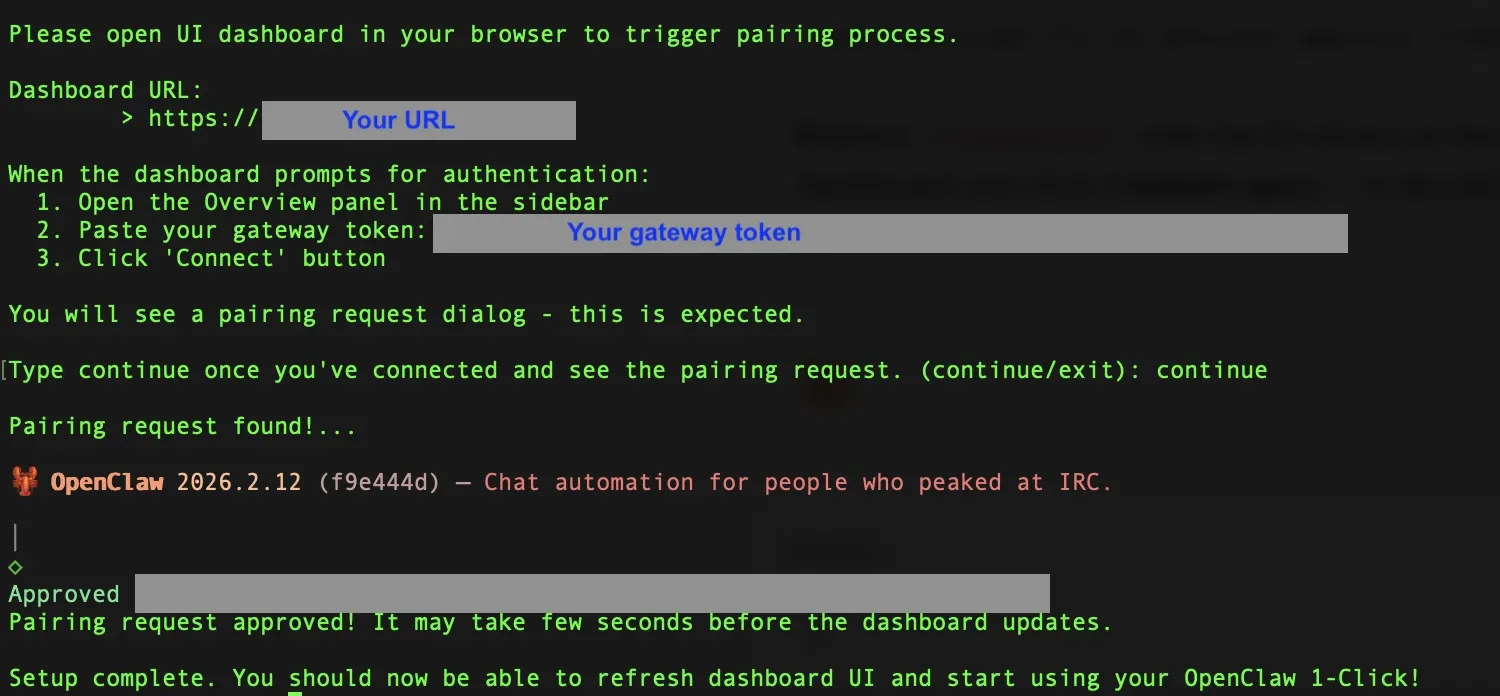
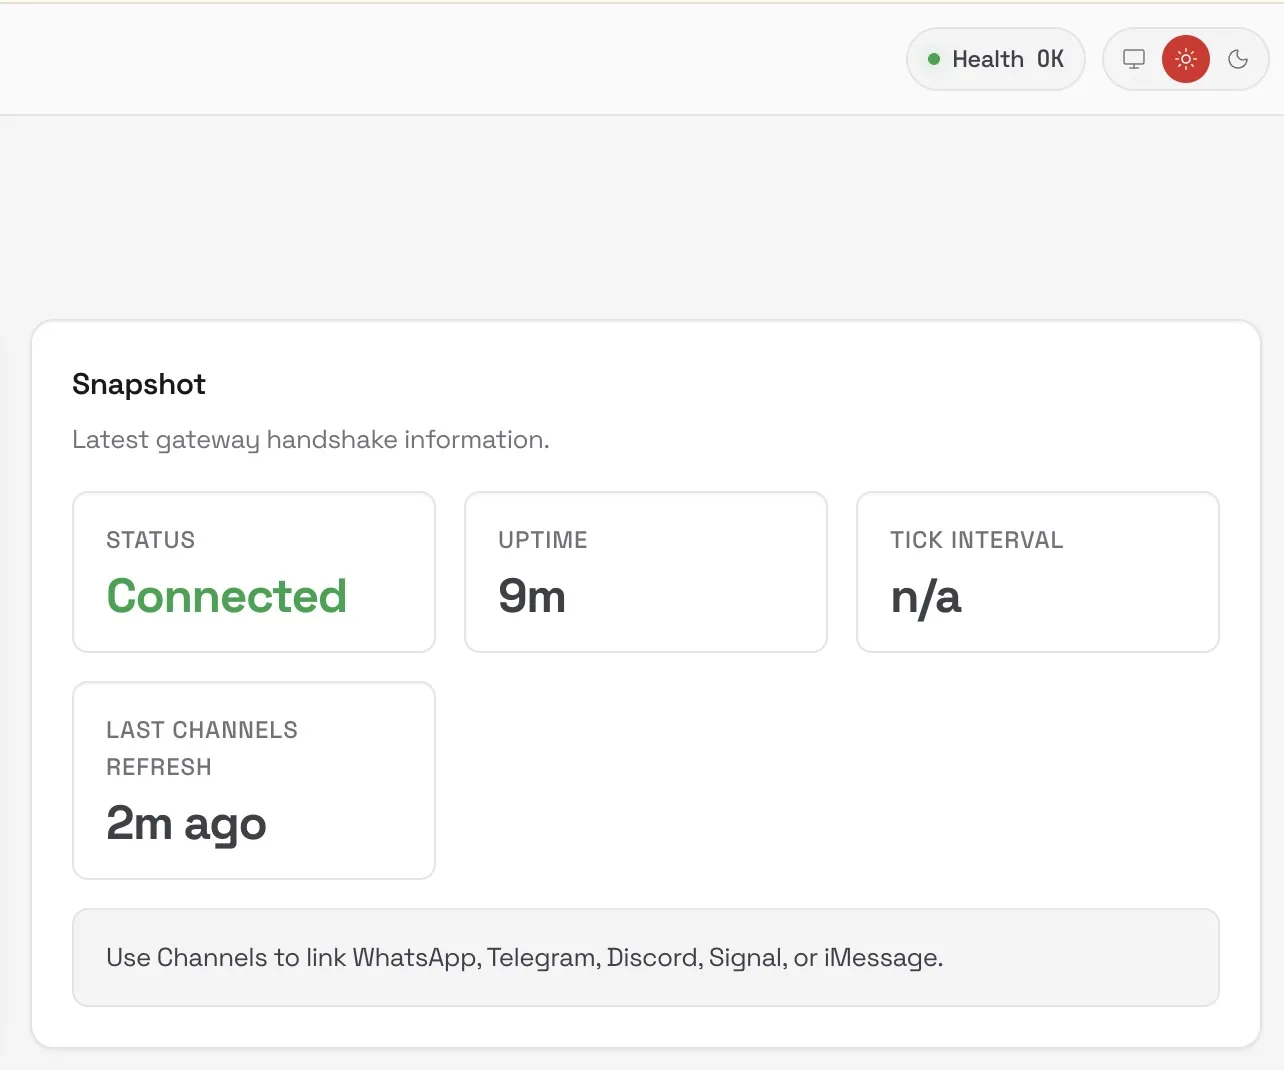
Step 5: Connect the Web Dashboard (5 minutes)
The OpenClaw web dashboard lets you monitor your assistant’s activity, view logs, and manage settings from a browser. Connect it using the gateway token generated during the OpenClaw install wizard in Step 4.
5a. Open the dashboard
The setup wizard showed you a URL (something like https://your-ip:port). Open it in your browser.
5b. Pair the dashboard
- Paste the Gateway Token from Step 4b into the connection field
- Click Connect
- Go back to your terminal — you’ll see a prompt asking you to approve the pairing. Type
yes

- The dashboard should now show “Connected”
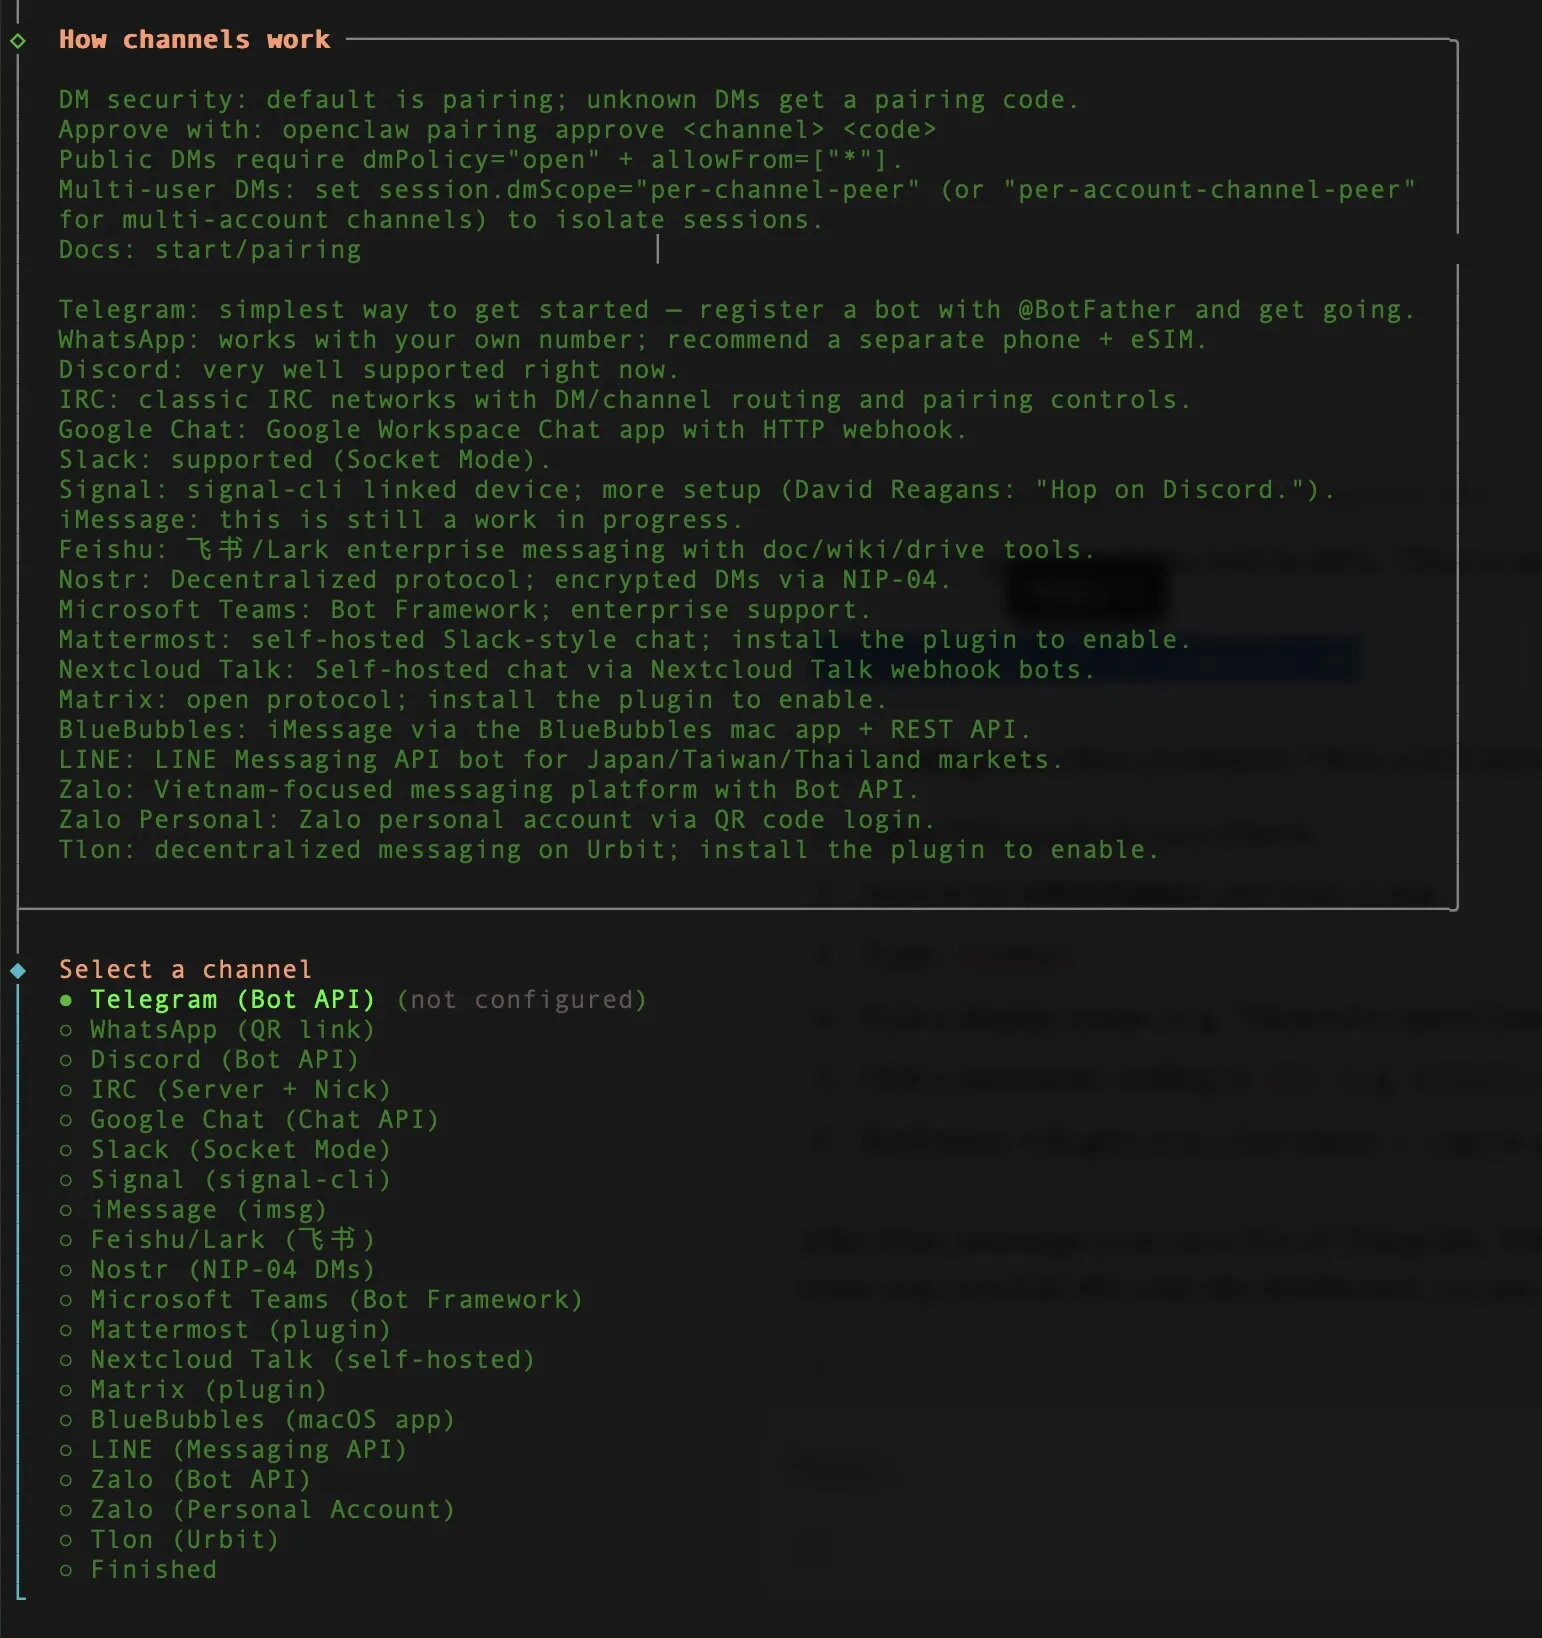
Step 6: Create Your Telegram Bot (10 minutes)
Telegram is the primary chat interface for OpenClaw — you’ll talk to your AI assistant through a Telegram bot, just like texting a contact. Create the bot using Telegram’s @BotFather, then connect it to OpenClaw with your bot token and user ID.
All 11 steps in a clean, printable format — keep it open on your laptop while you set up your server. No need to tab back and forth.
Download the PDF
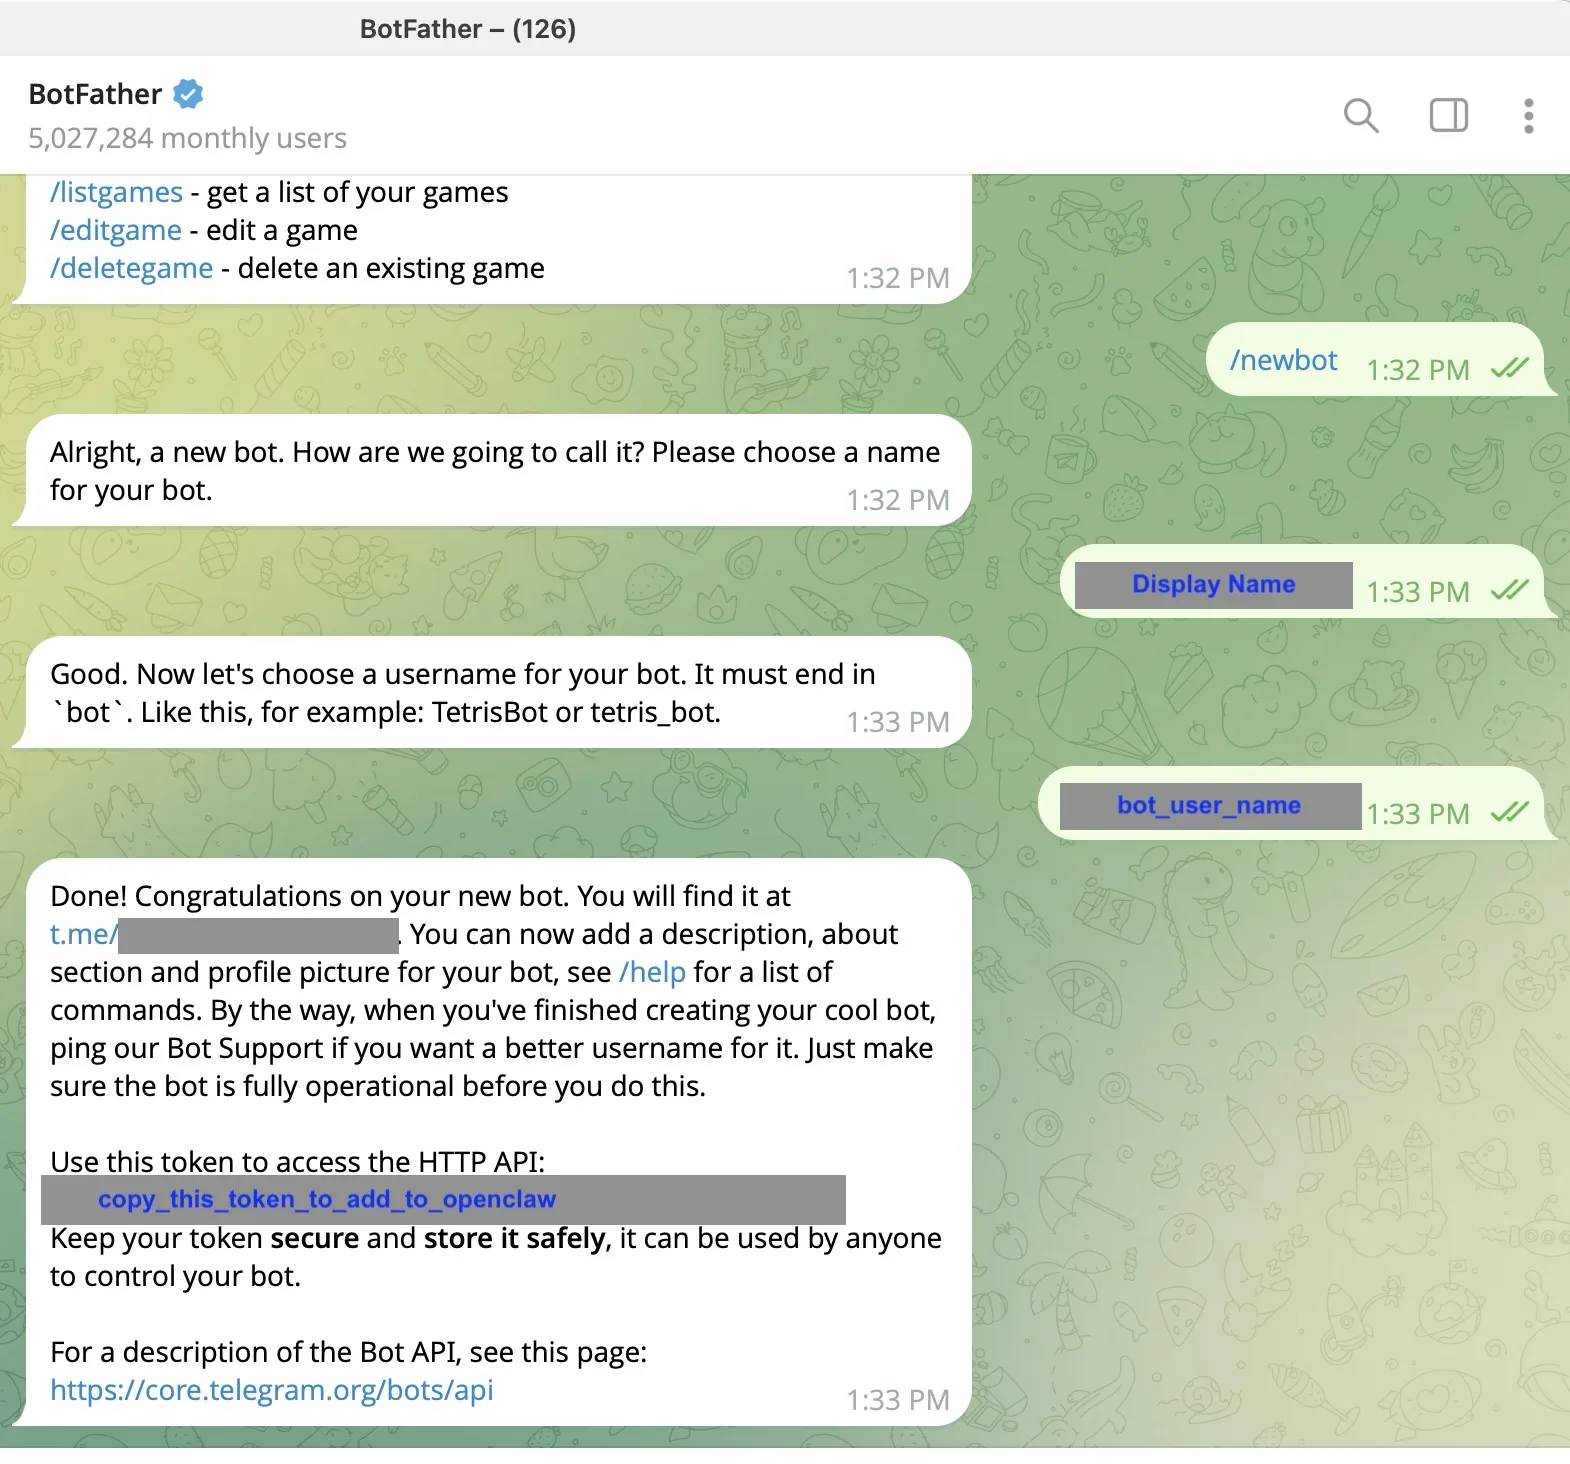
6a. Create the bot
- Open Telegram on your phone or computer
- Search for @BotFather (this is Telegram’s official tool for creating bots) or open t.me/BotFather
- Send BotFather this message:
/newbot - BotFather will ask you for a name — type something like “My AI Assistant”
- Then it asks for a username — this must end in “bot”, like
dhawal_ai_bot - BotFather will reply with a bot token — a long string of numbers and letters. Copy this token.
6b. Get your Telegram user ID
Your assistant needs to know your Telegram user ID so it only responds to you (not strangers).
- Open Telegram and search for @userinfobot or open t.me/userinfobot
- Send it any message
- It will reply with your user ID — a number like
123456789. Copy this number.
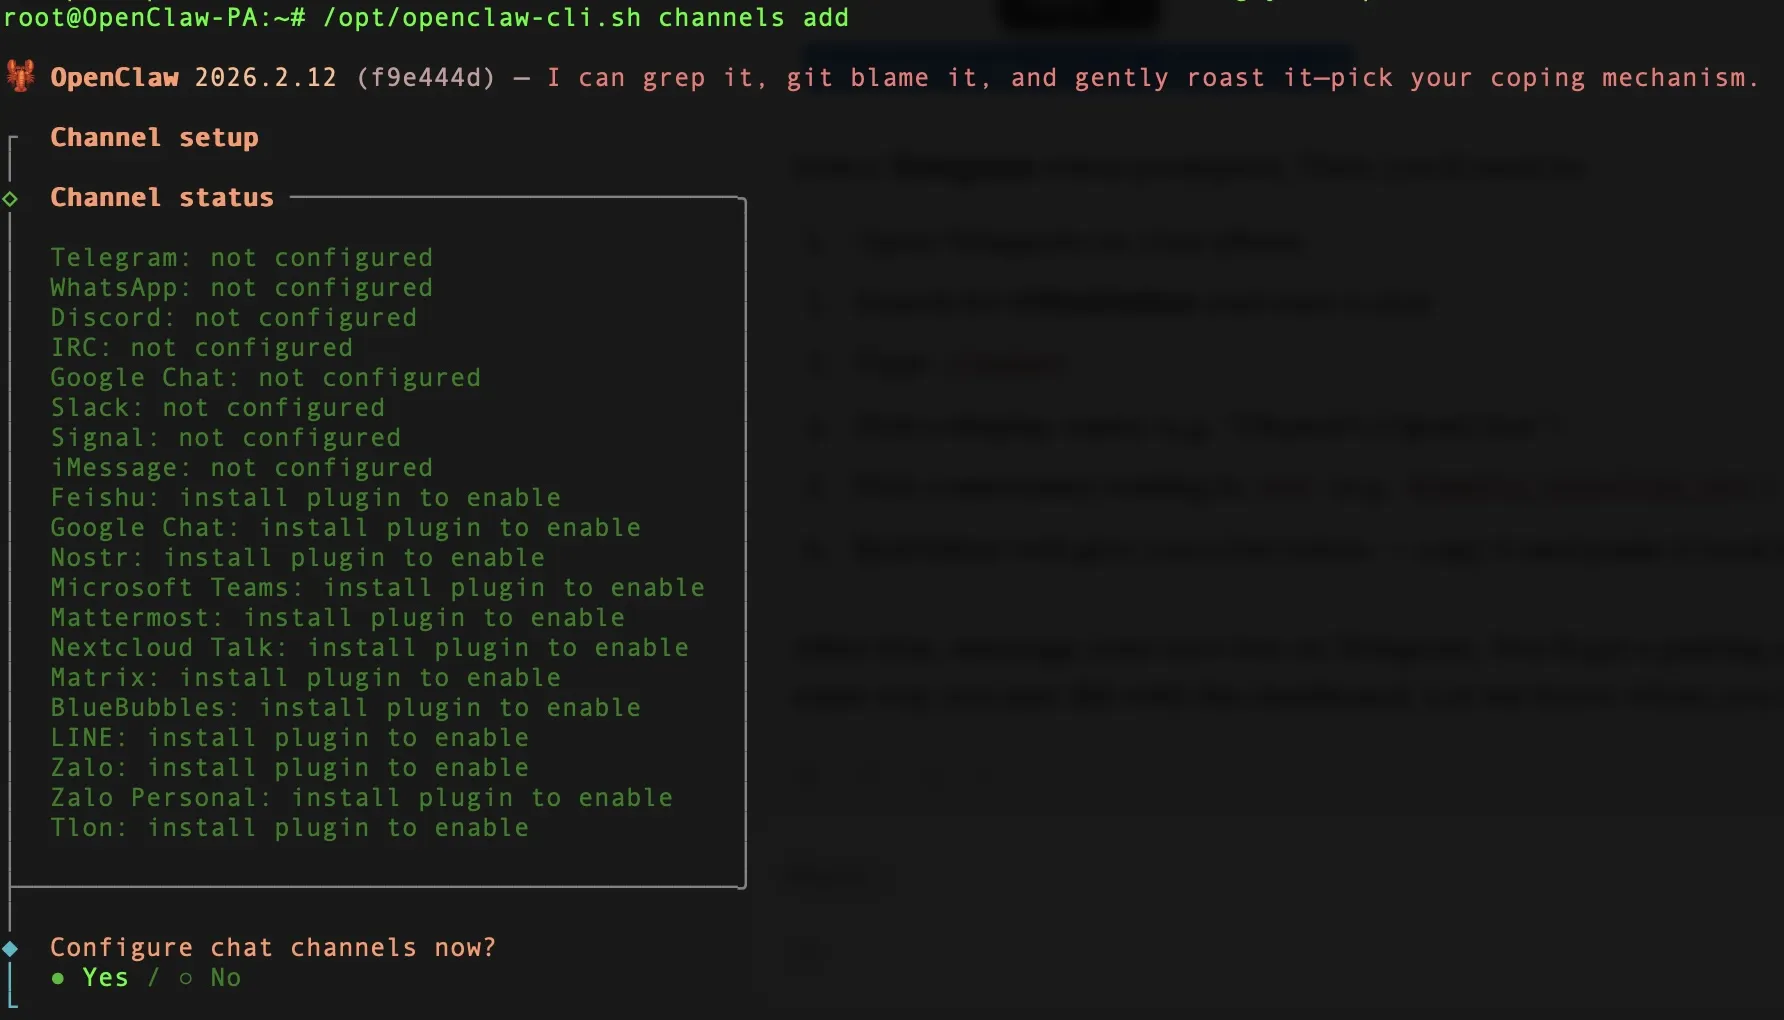
6c. Connect the bot to OpenClaw
Back in your terminal (still connected to your server):
- The wizard should be showing channel options. Select Telegram
- Paste the bot token from step 6a
- Paste your user ID from step 6b

6d. Test it
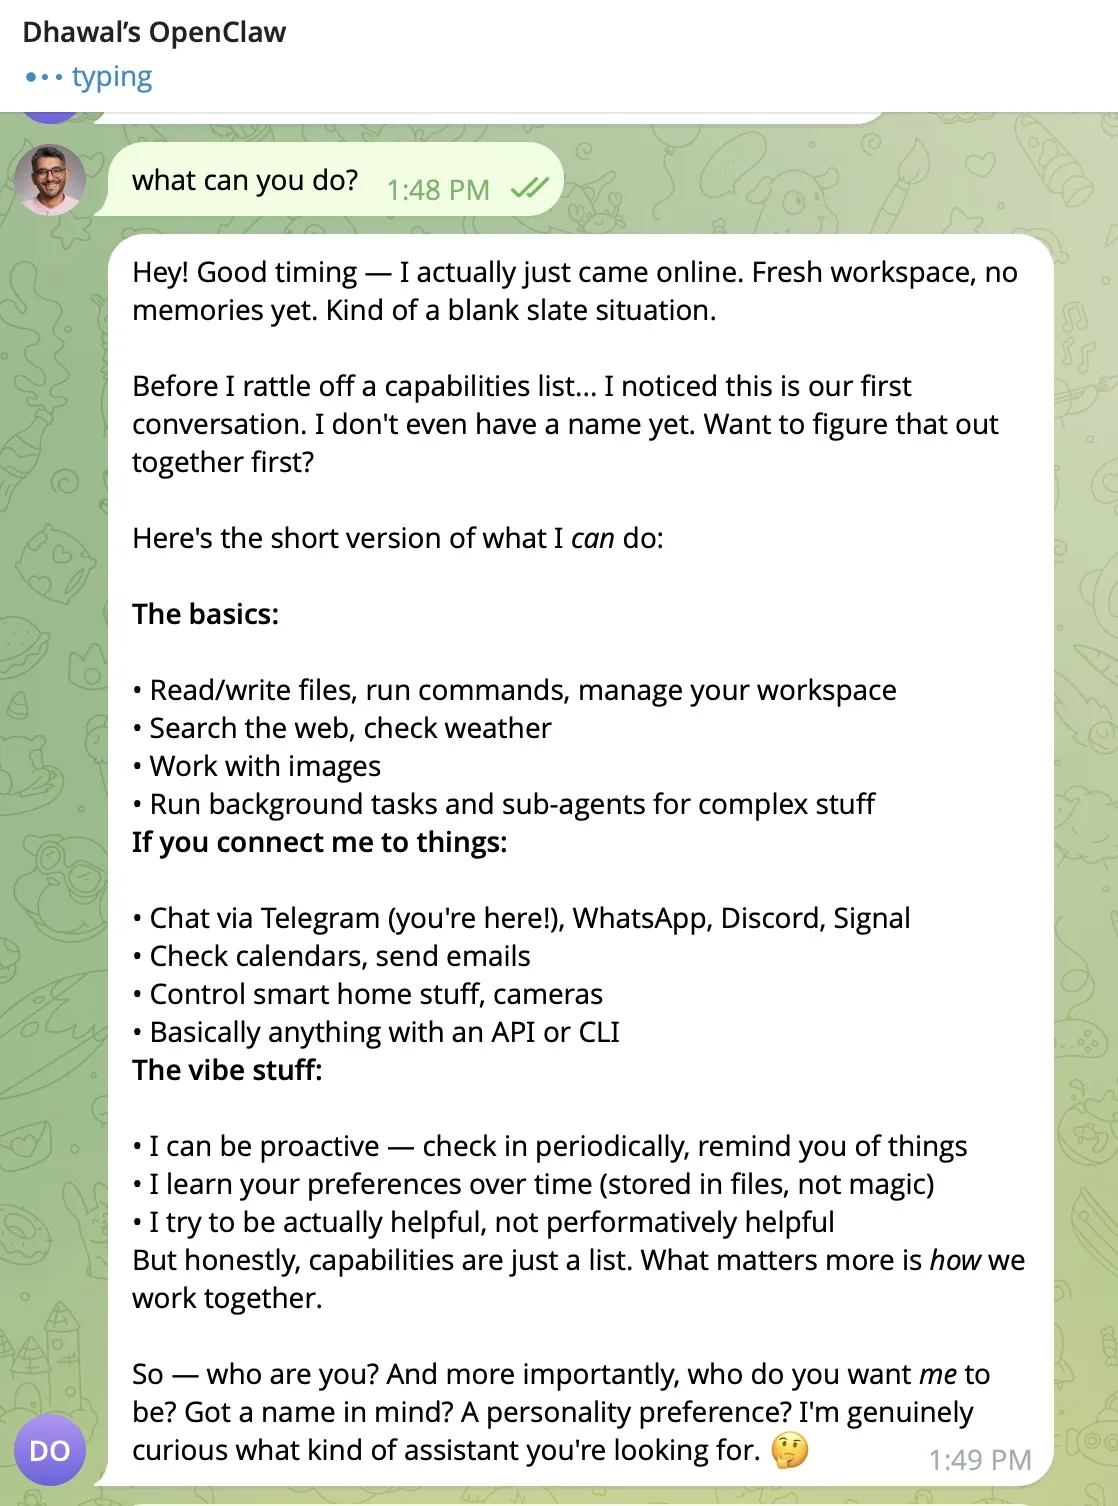
Open Telegram, find the bot you just created, and send it a message like “Hello, who are you?”
If it replies, congratulations — your AI assistant is alive.
Step 7: Keep API Costs Under $5 Per Month
OpenClaw API costs can be kept under $5/month by routing routine tasks to a cheap Gemini model and using Claude Haiku as a fallback, on top of the $24/month DigitalOcean server fee. Without this optimization, costs spike fast — my first 2 days of testing burned through $150 in Anthropic credits because every message defaulted to Claude Sonnet. Browser automation with Playwright made it worse, sending full page snapshots that consumed thousands of tokens per request.
The fix: use cheap models for routine tasks, and save the expensive models for when you really need them.
7a. Set up multi-model routing
You need to edit a configuration file on your server. In your terminal, run:
sudo nano /home/openclaw/.openclaw/openclaw.jsonWhat’s
nano? It’s a simple text editor that runs in the terminal. Use arrow keys to move around, type to edit, pressCtrl + OthenEnterto save, andCtrl + Xto exit.
Find the "models" section (or add it) and set it to:
{
  "models": {
    "primary": "gemini-3.1-flash-lite-preview",
    "fallback": "claude-haiku-4.5",
    "heartbeat": "gemini-3.1-flash-lite-preview",
    "sub_agent": "claude-haiku-4.5"
  }
}
What this does:
- Gemini 3.1 Flash Lite (near-free) handles 90% of daily tasks: quick lookups, simple questions, background checks. It’s a revelation compared to older Flash models — noticeably better understanding and responses even at “low” thinking mode, while keeping costs minimal
- Claude Haiku (cheap) picks up anything that needs stronger reasoning
- You can manually switch to Claude Sonnet (the powerful model) in Telegram by typing
/model— only use this for serious writing or complex analysis
Note: OpenClaw evolves rapidly — new models and versions ship frequently. The model names above reflect what works best as of March 2026. Check Google AI Studio for the latest available Gemini models.
7b. Force text-only web fetching (not screenshots)
By default, OpenClaw can use a built-in browser (Playwright) to visit websites. The problem: it takes a full screenshot of every page and sends it to the AI model — that’s 2,000-5,000 tokens per page, which adds up fast.
The fix is to disable the browser tool and force OpenClaw to use web_fetch instead, which only sends the text content of a page. Add this to your openclaw.json:
{
  "tools": {
    "disabled": ["browser"]
  }
}
With the browser tool disabled, when you ask your assistant to check a website, it’ll use web_fetch automatically — same information, a fraction of the cost.
If you occasionally need the full browser (for sites that require JavaScript to load), you can re-enable it temporarily by editing the config and restarting: systemctl restart openclaw.
7c. Keep workspace files short
Your SOUL.md, USER.md, HEARTBEAT.md, and BOOTSTRAP.md files load into every single API call. If each file is 500 words, that’s 2,000 extra words (roughly 2,500 tokens) on every message you send — even a simple “what time is it?”
Keep each file under 100 words. Be ruthless. Use bullet points, not paragraphs. Every word costs you money on every interaction.
7d. Start fresh Telegram sessions regularly
Every message you send in Telegram includes the full conversation history from that session. After 20-30 messages, you’re sending thousands of tokens of old context with every new question.
To start a fresh session, send this command to your bot in Telegram:
/resetThis clears the conversation history and starts clean. Your assistant still knows who you are (that comes from the workspace files), but it won’t be carrying around old conversations. I reset mine every morning, or whenever I switch topics.
7e. Set active hours for background checks
Heartbeat checks (the background monitoring your assistant does) run on a schedule. There’s no reason to check your email or the news at 3 AM.
In your openclaw.json, add active hours to the heartbeat config:
{
  "heartbeat": {
    "active_hours": {
      "start": "08:00",
      "end": "23:00"
    }
  }
}
This tells OpenClaw to only run heartbeat checks between 8 AM and 11 PM (using your server’s timezone). Outside those hours, the assistant stays quiet and doesn’t burn any tokens.
Reminder: Check your server’s timezone with
timedatectl. If it’s set to UTC and you’re in Singapore (UTC+8), “08:00” in the config means 4 PM your time. Set the timezone first:sudo timedatectl set-timezone Asia/Singapore
Step 8: Give Your Assistant a Personality (15 minutes)
OpenClaw uses four workspace files — SOUL.md, USER.md, HEARTBEAT.md, and BOOTSTRAP.md — to define your assistant’s personality, know who you are, and run background tasks. These files live in /home/openclaw/.openclaw/workspace/ and load into every API call, so keep them short.
8a. Create the personality file (SOUL.md)
This defines how your assistant talks and behaves.
sudo nano /home/openclaw/.openclaw/workspace/SOUL.mdWrite a short description of the personality you want. Here’s a starter template:
You are my private AI assistant. Be direct and concise.
Skip pleasantries. No emoji. Answer in short paragraphs.
When you don't know something, say so. Don't make things up.
Never send emails without my explicit approval.
Save the file (Ctrl + O, Enter, Ctrl + X).
8b. Create the user profile (USER.md)
This tells the assistant who you are so it doesn’t start every conversation cold.
sudo nano /home/openclaw/.openclaw/workspace/USER.mdExample:
I'm [Your Name], [your role] at [your company].
I'm based in [your city/timezone].
I prefer direct communication, no jargon.
My current priorities: [list 2-3 things you're focused on].
8c. Create the background checks file (HEARTBEAT.md)
This tells the assistant what to check in the background. Keep it minimal to save on costs.
sudo nano /home/openclaw/.openclaw/workspace/HEARTBEAT.mdExample:
Check these in a single pass:
1. Any urgent emails in the last hour
2. Calendar events in the next 2 hours
8d. Create the startup file (BOOTSTRAP.md)
This runs every time the assistant starts a new session.
sudo nano /home/openclaw/.openclaw/workspace/BOOTSTRAP.mdOn startup, read SOUL.md, USER.md, and HEARTBEAT.md from the workspace.
Do not ask who I am. Do not introduce yourself. Just be ready.8e. Fix file permissions (critical step)
Remember the openclaw user from Step 4c? These files need to be owned by that user, otherwise the assistant can’t read them:
chown -R openclaw:openclaw /home/openclaw/.openclaw/workspace/8f. Test it
Send a message to your Telegram bot. If the assistant responds with the personality you defined, the files are working. If it asks “Who are you?”, the files aren’t loading — double-check the file paths and ownership from Step 8e.
Step 9: Connect Gmail and Set Up Morning Briefings (15 minutes)
OpenClaw can connect to Gmail via IMAP using a Google App Password, then deliver automated morning briefings to your Telegram bot on a cron schedule. Only watch the INBOX folder — Gmail’s special folders like [Gmail]/All Mail contain brackets that crash the OpenClaw email parser.
9a. Add your email credentials to the server
Run this command to open the environment file:
sudo nano /opt/openclaw.envAdd these two lines at the bottom (replace with your actual email and the app password from Step 1e):
OPENCLAW_EMAIL_ADDRESS=your-email@gmail.com
OPENCLAW_EMAIL_PASSWORD=your-16-character-app-password
Save and exit (Ctrl + O, Enter, Ctrl + X).
9b. Configure the email watcher
Open the main config file:
sudo nano /home/openclaw/.openclaw/openclaw.jsonFind or add the email section and set it to watch only the INBOX:
{
  "email": {
    "folders": ["INBOX"]
  }
}
Why only INBOX? Gmail has special folder names like
[Gmail]/All Mailthat contain brackets and slashes. These crash the parser. I lost hours debugging this — just useINBOX.
9c. Set up your morning briefing
This creates an automated daily check that runs Monday through Friday at 7 AM:
su - openclaw -c 'openclaw cron add --schedule "0 7 * * 1-5" --prompt "Give me: 1) Top 3 AI and digital marketing headlines 2) Any urgent emails 3) Calendar events today" --channel telegram'What’s
su - openclaw -c? This runs the command as theopenclawuser instead ofroot. Remember the rule from Step 4c — always run OpenClaw commands as theopenclawuser.
9d. Troubleshooting the morning briefing
If your assistant replies to messages fine but the morning briefing never arrives:
- The chat ID might be missing. Send any message to your bot in Telegram first, then re-add the cron job from Step 9c
- Check the timezone. The
0 7 * * 1-5schedule uses your server’s timezone. To check it, runtimedatectl. To change it:sudo timedatectl set-timezone Asia/Singapore(replace with your timezone)
Step 10: When Things Go Wrong — Reinstall OpenClaw Fresh
The fastest way to fix a broken OpenClaw install is a clean reinstall on a new DigitalOcean droplet using the 1-Click Marketplace image. I rebuilt my OpenClaw setup from scratch on day 16 after too many incremental fixes. The fresh install took less time than the original debugging.
Signs you should reset
- Old bot tokens stuck in config files after rotation
- Sandbox permissions have been changed so many times you’re not sure what state they’re in
- The assistant references outdated information you can’t trace to a workspace file
How to reinstall (step by step)
- Back up your files — download your workspace files and config to your own computer:
scp root@your-droplet-ip:/home/openclaw/.openclaw/workspace/*.md ~/Desktop/openclaw-backup/ scp root@your-droplet-ip:/home/openclaw/.openclaw/openclaw.json ~/Desktop/openclaw-backup/ - Destroy the droplet — go to cloud.digitalocean.com, click on your droplet, then Destroy at the bottom
- Create a new droplet — repeat Step 3 with the latest OpenClaw Marketplace image
- Run the setup wizard with fresh API keys (repeat Steps 4-6)
- Revoke the old Telegram bot — go to @BotFather in Telegram, send
/deletebot, and select the old bot. Then create a new one per Step 6 - Upload your backed-up files to the new server:
scp ~/Desktop/openclaw-backup/*.md root@new-droplet-ip:/home/openclaw/.openclaw/workspace/ scp ~/Desktop/openclaw-backup/openclaw.json root@new-droplet-ip:/home/openclaw/.openclaw/ - Fix permissions:
chown -R openclaw:openclaw /home/openclaw/.openclaw/ - Re-add cron jobs from Step 9c
Rotate all API keys during a reset — this is an OpenClaw security essential. If any keys appeared in terminal screenshots or logs during troubleshooting, consider them compromised. Generate new ones from console.anthropic.com, aistudio.google.com, and @BotFather.
Quick tests after a fresh install
Run these three commands to verify everything works:
su - openclaw -c 'openclaw run "echo whoami"'  # Test: server access
su - openclaw -c 'openclaw run "ls workspace/"'  # Test: file access
su - openclaw -c 'openclaw run "curl -s google.com | head -5"'  # Test: internet access
If all three succeed, you’re back in business.
Step 11: Keeping Your OpenClaw Install Up to Date
To update OpenClaw, run sudo /opt/update-openclaw.sh or npm install -g openclaw@latest followed by systemctl restart openclaw. OpenClaw evolves rapidly — new releases ship every few days. You don’t need to update every time. In practice, upgrading once a month or when a major feature lands is plenty. The core setup is stable; most updates add new skills and model integrations rather than breaking changes.
How to upgrade
Option A — Use the built-in update script (easiest):
sudo /opt/update-openclaw.shOption B — Manual install of the latest version:
npm install -g openclaw@latest
systemctl restart openclaw
Before you upgrade
Always back up your config first:
cp /home/openclaw/.openclaw/openclaw.json /home/openclaw/.openclaw/openclaw.json.bakCheck the OpenClaw releases page on GitHub and look for anything tagged “BREAKING” — these require config changes. The OpenClaw docs also cover migration steps for major version bumps.
If an upgrade breaks things
Roll back to the previous version:
npm install -g openclaw@previous-version
systemctl restart openclaw
Then restore your config backup:
cp /home/openclaw/.openclaw/openclaw.json.bak /home/openclaw/.openclaw/openclaw.json
systemctl restart openclaw
Recommended update schedule: once a month, or when you see a feature you want. Don’t stress about staying on the latest version — OpenClaw’s core is stable and most updates are additive. Read the changelog first and test in Telegram immediately after upgrading.
Frequently Asked Questions
How do you fix OpenClaw Docker sandbox permission errors?
To fix OpenClaw Docker sandbox permission errors, keep sandbox.mode set to "all" in your openclaw.json config file and add a tools.elevated section with allowFrom: { telegram: ["*"] }. This grants host-level access through Telegram while keeping the OpenClaw Docker sandbox wrapper in place. Avoid setting sandbox.mode to "none" — it was broken in OpenClaw v2.12 and caused validation errors.
Can you use Claude Max subscription tokens with OpenClaw?
No, you cannot use Claude Max subscription OAuth tokens with OpenClaw — doing so violates Anthropic's Terms of Service. The legitimate alternative is installing Claude Code (Anthropic's official CLI) on your server and having OpenClaw delegate tasks to it. This gives you flat-rate Claude access without per-token API billing.
What is the cheapest model configuration for OpenClaw?
The cheapest OpenClaw model configuration uses Google Gemini 3.1 Flash Lite as the primary and heartbeat model (near-zero cost on Google AI Studio's free tier) with Anthropic's Claude Haiku 4.5 as the fallback for tasks that need stronger reasoning. Gemini 3.1 Flash Lite is a significant upgrade over older Flash models — better understanding and responses even at "low" thinking mode. This OpenClaw setup handles 90% of daily tasks for under $5/month in API costs, on top of the $24/month DigitalOcean server fee. Check Google AI Studio for the latest available models, as new options appear frequently.
How often should you upgrade OpenClaw?
Once a month is plenty. OpenClaw evolves rapidly with new releases every few days, but the core setup is stable and most updates are additive — new skills, model integrations, and quality-of-life improvements. Don't stress about staying on the bleeding edge unless you see a specific feature or security fix you need. When you do upgrade, back up openclaw.json first, check the OpenClaw GitHub changelog for "BREAKING" entries, and test in Telegram immediately after. Roll back with npm install -g openclaw@previous-version if something breaks.
What VPS specs does OpenClaw need?
OpenClaw requires a minimum of 4GB RAM and 2 CPUs to run reliably. A DigitalOcean droplet with 4GB RAM / 2 CPUs / 80GB SSD costs $24/month and is a solid VPS for OpenClaw with Telegram integration, Gmail email monitoring, and cron-based morning briefings. You do not need more unless you plan to run heavy browser automation or multiple simultaneous agents. Choose a server region close to you to minimize Telegram message latency. For full details, see the OpenClaw docs on GitHub.
How do you fix OpenClaw "permission denied" errors?
OpenClaw "permission denied" errors are almost always a file ownership issue. Run chown -R openclaw:openclaw /home/openclaw/.openclaw/ to make sure the openclaw user owns all config and workspace files. If you get a "token mismatch" error, you're probably running the command as root instead of the openclaw user — prefix your command with su - openclaw -c '...'.
Why is my OpenClaw morning briefing not arriving in Telegram?
If your OpenClaw morning briefing doesn't arrive in Telegram, there are two common causes: (1) The Telegram chat ID is missing from the OpenClaw config — fix this by sending any message to your bot first, then re-add the cron job with su - openclaw -c 'openclaw cron add ...'. (2) The server timezone doesn't match your local time. Check with timedatectl and change with sudo timedatectl set-timezone Your/Timezone.
This is the companion guide to How I Built a Private AI Assistant That Runs My Morning Briefings. For more on AI workflows and automation, visit AI for Business.
Questions about setting up your own AI assistant? Get in touch.